CS 1 or 2 Image Editor
Electronic Due Date: TBD
Grading Criteria
Learning Goals: Every student should understand the concepts of:
- input from and output to an external file
- loops reading from files
- inputting and outputting one-dimensional arrays
- passing one-dimensional arrays as parameters/arguments
- for loops
- buffers
- a little about image formats
PPM Image Format
The PPM (or Portable Pix Map) image format is encoded in human-readable ASCII text. For those of you who wish to have the experience of reading real documentation, the formal image specification can be found here.
Sample ppm file:
	P3
	4 4
	255
	0  0  0   100 0  0       0  0  0    255   0 255
	0  0  0    0 255 175     0  0  0     0    0  0
	0  0  0    0  0  0       0 15 175    0    0  0
	255 0 255  0  0  0       0  0  0    255  255 255
Image Header
You can think of the image as having two parts, a header and a body. The header consists of four enteries:
	P3
	4 4
	255
P3 is a "magic number". It indicates what type of PPM (full color, ASCII encoding) image this is. For this assignment it will always be P3.
Next comes the number of columns and the number of rows in the image (4 x 4).
Finally, we have the maximum color value 255. This can be any value, but a common value is 255.
The way you see the header presented is how it should be spaced out.
Image Body
The image body contains the actual picture information. Each pixel of the image is a tiny, colored square. The color is determined by how much red, green, and blue are present. So, 0 0 0 is the first color of the image, which is black, and the last pixel in the image is 255 255 255, which is white. By varying the levels of the RGB values you can come up with any color in between.
Note that color values must be separated by a space, but after than additional whitespace is ignored by the image viewer. In the sample ppm above we used additional whitespace to format the image so that it is easy for a human to understand, but the computer doesn't care if everything is on one line, if there is one line per line of the image, or some mix (we will keep 1 line of text = 1 line of the image for this assignment to make the images easier to read in a text editor).
Putting it all together
The example image above would look something like this:
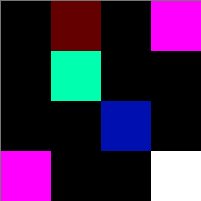
Keep in mind, each square is one pixel, so the real thing is much smaller (the rendered image was blown up by 5000%).
How to view PPM files
While PPM files are easy to view as text (you can use Notepad, for instance), and easy to work with in code, they are highly inefficient. Most modern image formats use some kind of compression to make their size reasonable while preserving the image appearance. This is not to say that PPMs don't still have some life in them--one modern use for PPM is an intermediate format when converting images from one type to another.
You will need to install a program to view these images on a Windows machine. We find that Irfanview is a small download and works quite well. It will also allow you to convert your own images to PPM so you can practice with pictures you took in the past (keep in mind that you may need to make them very small or the resulting PPM will be quite large!).
Your Assignment
Whew! That may sound like a lot of work, but it's really pretty simple. To make it easy to code up we've broken the program into three phases. In the first you are reading the whole image and writing it to a file without making any changes to the image in the process. Believe it or not, at this point you've written most of the program! In phase II we add some effects, and in phase III we add a menu for the user.
Phase I:
The user will specify the name of the image file.
The file will be a text file in PPM format as described
in the discussion above.
If the image file cannot be opened, the program should report
that fact and abort the program.
The user will specify an output filename.
The purpose of the program is to make an exact copy of
the input file as the output file.
The "catch" is that you are limited to only one buffer array
which is 3000 integers long (would represent 1000 pixels).
This is not an unrealistic restriction.
(And 3000 should be set up so it is easy to change!)
A picture of a normal size could easily become hundreds
of thousands of numbers. You will not be able to read all
of the image into memory at one time. So you have to deal
with one piece of the file at a time.
HINT for a successful program: don't assume you will
always read in a complete bufferful of data. Instead
read in one ROW of the picture. Do you know how many
pixels you have in one row? Yes, you do if you think about it.
If the header of the file tells you that the number of columns
is larger than you can hold in the buffer, you should
tell the user what is happening and abort the program.
Another Hint: this is not a problem in string processing!
Note that many of the functions involve doing arithmetic
with the pixels.
You cannot do that with strings!
Your program is going to have to read in one bufferful,
write it out to the output file, and repeat the process
until the input is exhausted.
Your output file can actually be formatted as you like.
Whitespace includes newline characters, so you can put them
in where you wish. The format allows for it.
Example interaction with the user:
	Portable Pixmap (PPM) Image Editor!

	Enter name of image file:  feep.ppm
	Enter name of output file: out.ppm
	out.ppm created.
And the output file created would be in a file called out.ppm
and would be identical to feep.ppm.
Your program is NOT responsible for displaying the image in
the file, just to manipulate the pixels and create an output file
in the proper PPM format.
Test this with small files and large files. You can check
to see if they are identical by loading them both into Notepad
and comparing number by number.
Example ppm files can be downloaded here: ZIP Archive (1.2 MB) containing the following images:
- cake.ppm - A picture of a slice of cake on a plate
- squares.ppm - Some boxes
- blocks.ppm - Some solid blocks of color
- tinypix.ppm - The example image from above
Phase II:
Write a function called negate_red.
It will change just the RED color numbers
into their "negative". That is, if the red number is low, it should become
high and vice versa. The maximum color depth number is useful here.
If the red were 0, it would become 255; if it were 255 it would become 0.
If the red were 100, it would become 155.
It should make changes to the buffer array as described above.
When you have this function written, insert it into Phase I
so that every pixel of the picture has had its red color negated
in the output file.
View this picture - does it look as you expected?
Write a function called "flip_horizontal" which will flip the picture
horizontally. That is, the pixel that is on the far right end of the
row ends up on the far left of the row and vice versa (remember to preserve RGB order!).
Write a function called grey_scale which will change the picture
into a grey scale image. This is done by averaging the values of all three
color numbers for a pixel, the red, green and blue, and then
replacing them all by that average. So if the three colors were
25, 75 and 250, the average would be 116, and all three numbers would become
116.
Write a function called "flatten_red" which will set the red value to zero. Write similar functions for the other color numbers.
In summary, you must implement the following functionality:
- negate_red - Its job is to negate the red number of each pixel.
- negate_green, as above but change the green
- negate_blue, as above but change the blue
- flip_horizontal that flips each row horizontally
- grey_scale sets each pixel value to the average of the three
- flatten_red sets the red value to zero
- flatten_green sets the green value to zero
- flatten_blue sets the blue value to zero
Phase III:
The last part of the problem is to add a menu so that
the user can decide which of these effects will be applied to an image.
Example of user interaction:
	Portable Pixmap (PPM) Image Editor

	Enter name of image file:  cake.ppm
	Enter name of output file: outcake.ppm

	Here are your choices:
	[1]  convert to greyscale [2]  flip horizontally
	[3]  negative of red [4]  negative of green [5]  negative of blue
	[6]  just the reds   [7]  just the greens   [8]  just the blues

	Do you want [1]? (y/n)  y
	Do you want [2]? (y/n)  n
	Do you want [3]? (y/n)  y
	Do you want [4]? (y/n)  n
	Do you want [5]? (y/n)  n
	Do you want [6]? (y/n)  n
	Do you want [7]? (y/n)  n
	Do you want [8]? (y/n)  y

	outcake.ppm created.
You should apply the desired effects to the image one at a time.
Testing:
Your input routine should avoid
reading from a failed input stream. What if the file
is not as large as the row and column numbers indicate it will be?
Does your code handle that gracefully (without falling into
infinite loops, for example)?
All your manipulations should NOT cause a color number to
be less than 0 nor larger than the maximum color depth specified
in the file.
Bonus:
Implement up to 2 of these other functions. Each will be worth up
to 5 points.
- "horizontal_blur" which will take the values of the red numbers of
three adjacent pixels and replace them with their average -
note that this is different from greyscale! it also does the
same with the greens and the blues of 3 adjacent pixels.
Pixels on the edges will have to be handled specially.
- "extreme_contrast" which will change each color number
to either the highest color number possible or to 0. This change
is based on whether it is greater than the midpoint of the color
range, or less. If it is greater than half of the color depth,
replace it with the colordepth. If it is less, replace it with zero.
- "random_noise" adds a random number to each color
number or subtracts a random number.
It would have a parameter which would represent the size of
the random number range; i.e. a value of 10 would add or subtract
numbers in the range of 0 to 9, a value of 50 would add or subtract
numbers in the range 0 to 49. Another random number would decide whether
it was an addition or a subtraction. Remember that the values in the
buffer should not exceed the colordepth nor get less than 0.
You can use the extreme values instead.
Please read the documentation standard on the class web page.
We will be looking to see how you meet these standards.
Electronically, turn in a zip file containing:
- your source code as a cpp file (image_editor.cpp) (Phase III)
- sample input images (ppm) and corresponding output images (ppm)