Inspired by André Michelle's amazing Tone Matrix. The idea to use the Karplus-Strong algorithm comes from Kevin Wayne's "Guitar Heroine" Nifty Assignment.
In this assignment, you'll build a digital instrument, the Tone Matrix, controlled with a simple visual interface. The Tone Matrix is a square grid of lights, each of which is initially turned off. The user can turn lights on and off by clicking and dragging across the grid.
Each light in the grid represents a musical note at a specific point in time. Lights further to the left are played before lights further to the right. The row of a light determines which note is played: lights toward the bottom of the Tone Matrix have a lower pitch than lights toward the top. All lights on the same row play the same note and correspond to playing that note at different points in time. If multiple lights are turned on in the same column, they will be played simultaneously when their column is played.
Here's a video demonstrating the Tone Matrix in action:
Over the course of this assignment, you will implement all the parts of the Tone Matrix - the code to generate the sounds, the code that interfaces with the mouse, and the code that draws everything on the screen. In doing so, you will gain experience implementing classes and working with arrays.
This assignment has two parts:
-
String Simulation: Implement a simulation of a string instrument that generates the sounds used by the Tone Matrix.
-
Tone Matrix: Respond to input from the user, plus requests from your computer's sound hardware, to build and display the overall Tone Matrix.
Part One: Simulate a String Instrument
Your first step in building the Tone Matrix is to implement a StringInstrument type that performs a simplified physical simulation of a plucked string instrument. We'll begin with a quick overview of how computers handle sound, then discuss what you need to do.
Overview: Sound Waves and Digital Sound
Sound is a type of wave that moves through the air. The characteristics of those waves determine what you hear. A full description of sound perception is beyond the scope of this course, so for the purposes of this assignment we'll focus on three attributes of sound waves. Those attributes are the amplitude of the wave (how intensely the wave oscillates between high and low), the frequency of the wave (how many times the wave changes from high to low in one second), and the shape of the wave (the pattern by which the wave switches from high to low). Below is an interactive demo that lets you change these three aspects of a sound wave so you can hear how those changes are perceived. The plot you see below shows a visual representation of the waveform.
Here's a brief summary of how amplitude, frequency, and shape influence your perception of the sound:
-
The amplitude of the wave changes the volume of the sound. If you increase the amplitude, you will hear a louder sound. If you decrease the amplitude, you will hear a quieter sound.
-
The frequency of the wave changes the pitch of the sound. If you increase the frequency, you hear a higher pitch. If you decrease the frequency, you hear a lower pitch. Frequencies are typically measured in hertz (Hz). The human ear is not equally sensitive to all frequencies; two waves of equal amplitude but different frequency may not have the same volume. If you drag the frequency slider above, you may notice the volume changing even though the amplitude is constant.
-
The shape of the wave changes the timbre or "character" of the sound. If you change the shape of a wave, you'll hear the same note, but its "style" will seem different.
Your computer generates sound by determining the shape of the waveform to play, then sending that waveform to the output device (your computer's speakers, your headphones, etc.). The output device then creates the waveform by causing a speaker to vibrate.
There are many ways a computer could in principle store the shape of the wave. The most common method is called sampling: rather than storing the full sound wave, the computer stores the height of the wave at various evenly-spaced points in time. Here's a visual of what this might look like:
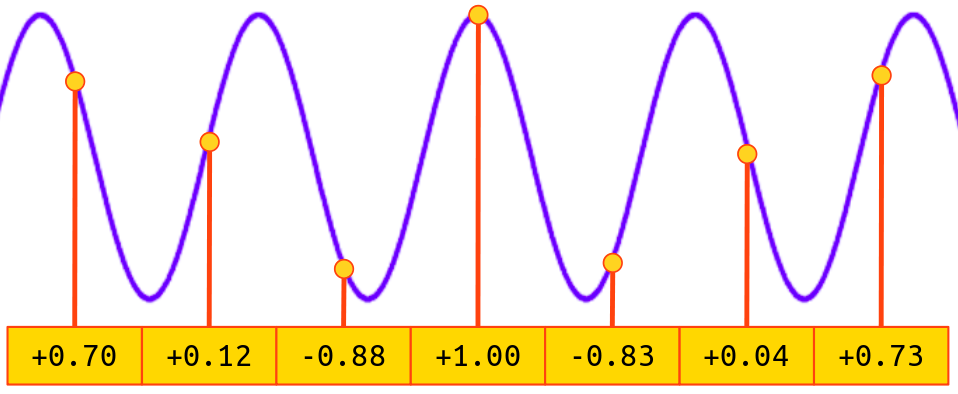
Each stored height is called a sample, and typically samples are real numbers in the range from -1 to +1. The more samples the computer takes, the better it's able to reproduce the sound wave. It's common for the computer to store 44,100 samples of a wave per second. The exact number of samples taken per second is called the sampling rate and is typically measured in hertz.
To summarize, the computer treats a sound wave as an array of real numbers from -1 to +1, where each real number gives information about the intensity of the sound wave at a given point in time. By changing what those real numbers are, the computer can change the shape of the waveform sent to the speakers. By changing the wave's amplitude, frequency, and shape, the computer can change what sound you ultimately perceive.
Overview: The StringInstrument Type
Your first task in this assignment is to implement a simulation of a plucked string instrument. (1) Specifically, you will implement the class StringInstrument, which is defined as follows:
public class StringInstrument {
    /* Constructs a string that vibrates at the given frequency. */
    public StringInstrument(double frequency) { ... }

    /* Simulates plucking the string. */
    public void pluck() { ... }

    /* Returns the next sample in the sound wave corresponding to the
     * string vibrating.
     */
    public double nextSample() { ... }

    /* The waveform of the vibrating string, described below. */
    double[] waveform;

    /* Position of the next sample in the waveform, described below. */
    int cursor;
};
When you create a StringInstrument, you specify the frequency in hertz at which the string vibrates. (As a reminder, the frequency controls the pitch of the sound.) The string initially is at rest and does not vibrate. Calling the pluck() method simulates plucking the string and causing it to vibrate. Repeatedly calling nextSample() retrieve samples of the resulting sound wave, which can be sent to the computer speakers or stored for further processing. Here is an example of how a client of StringInstrument might use it:
var guitarString = new StringInstrument(440.0); // 440Hz is concert A
guitarString.pluck();

/* Generate 10,000 samples of the sound wave from the vibrating string. */
for (int i = 0; i < 10000; i++) {
    double sample = guitarString.nextSample();
    // do something with the sound sample
}
Here is how this type works internally. The constructor creates an array of doubles whose size depends on the frequency. Specifically, the array has size AudioSystem.sampleRate() / frequency, where AudioSystem.sampleRate() denotes the computer's sampling rate. Note that increasing the frequency decreases the number of array elements, while decreasing the frequency increases the number of array elements. Each double in the array should be initialized to zero.
When the string is plucked by a call to pluck(), we change the samples stored in the array. Specifically, we set the first half of the array elements to +0.05 and the back half of the array elements to -0.05. (Those of you with a background in signal processing might recognize this as a square wave). (2)
Finally, let's describe how this array gives rise to the sound samples. We imagine a "cursor" that initially points at the first element of the array. To generate a sound sample, we do the following:
-
Make a note of the array element pointed at by the cursor. This will be our resulting sound sample.
-
Compute the average of this array element and the next array element. (If we're at the end of the array, wrap back around to the start to get the next element.) Then, multiply that average by 0.995. (3)
-
Replace the array element pointed at by the cursor with this new value.
-
Move the cursor forward one position, wrapping around if necessary.
Surprisingly, that's all that's needed to simulate a plucked string instrument! This approach is called the Karplus-Strong algorithm. If you're interested in a detailed analysis of why this produces a good approximation of the sound of a vibrating string, check the linked article.
Milestone One: Confirm Your Understanding
Before you proceed to write any code, answer each of the following questions. These questions are designed to ensure you understand the basics of the algorithm so that it's easier to put the code together.
Milestone One Requirements
Write your answers to each of these questions in the file ShortAnswers.txt.
Q1. Suppose the sample rate is 8,000Hz and we want to simulate a string that vibrates at 1,000Hz. Tell us what values will be in the waveform array when the string is first created and when it is first plucked.
Q2. Now suppose you call nextSample four times on the string after it has been plucked. Tell us what values will be in the waveform array.
Q3. Suppose instead of updating the waveform buffer with values +0.05 and -0.05 when the string is plucked, we fill the buffer with values +0.25 and -0.25. Does this change the amplitude, frequency, or shape of the wave? Based on your answer, what do you expect you would hear differently when listening to the sound of this string?
Milestone Two: Implement the Constructor
Your first task is to implement the constructor. The constructor initializes the waveform array as described above. It also sets the cursor to position 0, at the start of the buffer.
As a reminder, the length of the array is AudioSystem.sampleRate() / frequency. This value is not necessarily an integer, and you should use the default behavior of simply rounding down. An edge case to watch for: throw a RuntimeException if the frequency is zero or negative, or if the resulting array would have size 0 or 1.
We have provided some test cases to help you check whether your implementation is correct. However, these test cases are not exhaustive, and you will need to provide some test cases of your own.
To summarize, here's what you need to do:
Milestone Two Requirements
-
Implement the
StringInstrumentconstructor inStringInstrument.java. -
Add at least one custom test case, and ideally more, to
StringInstrumentTests.java. Then, use your tests and our provided tests to validate that your code works correctly. You should pass all tests for Milestone Two but fail the remaining tests.
Some notes on this problem:
-
You must not use any collections types (e.g.
ArrayList,HashMap, etc.) when coding up these functions. More generally, these types are unavailable to you throughout this assignment. -
Our test cases make use of a function
AudioSystem.setSampleRate()to change the sample rate. This makes it possible to control how many items should be in thewaveformarray. Feel free to use this function when writing your own test cases. However, don't use this function in your implementation of theStringInstrumentclass itself.
Milestone Three: Implement pluck()
Your next task is to implement StringInstrument.pluck. As a reminder, this fills the first half of the array to +0.05 and the second half to -0.05. If the array length is odd, you can set the middle element to either +0.05 or -0.05, your choice.
In addition to updating the array contents, the pluck() function also resets the cursor to position 0. This is not strictly necessary from a simulation perspective but greatly simplifies debugging later on in the assignment.
As before, you will need to write at least one test case for this function.
To summarize, here's what you need to do:
Milestone Three Requirements
-
Implement the
pluck()function inStringInstrument.java. -
Add at least one custom test, and ideally more, to
StringInstrumentTests.java. Use your tests and our provided tests to validate that your code works correctly. You should pass all tests for Milestone Two and Milestone Three but fail the remaining tests.
Some notes on this problem:
-
As a reminder, you must not use any collections classes (e.g.
ArrayList,HashMap, etc.) when coding up these functions. -
You should not allocate any arrays in the course of coding up this function. Instead, simply take the existing array and replace its values with these new ones.
-
Feel free to make use of
AudioSystem.setSampleRateto simplify the math in your test cases.
Milestone Four: Implement nextSample
Your final task for StringInstrument is to implement StringInstrument.nextSample(). This function returns the next sound sample and updates the waveform buffer and cursor position as described above.
As a note: if the user of StringInstrument calls nextSample before pluck has been called, the waveform buffer will be filled with 0s. You should still perform the normal calculations and move the cursor forward in this case. This is actually a convenient feature to have: it means that if you ask for the sound of a string that hasn't been plucked, you get a wave of all 0s, which has zero amplitude and thus zero sound.
As before, you will need to write at least one test case for this function.
To summarize, here's what you need to do:
Milestone Four Requirements
-
Implement the
nextSample()function inStringInstrument.java. -
Add at least one custom test case, and ideally more, to
StringInstrumentTests.java. Run the your tests and provided tests to validate that your code works correctly. At this point you should pass all tests for theStringInstrumenttype.
Some notes on this problem:
-
You must not use any collections classes (e.g.
ArrayList,HashMap, etc.) when coding up these functions. -
You should not allocate any new arrays in the course of coding up this function.
-
Feel free to use
AudioSystem.setSampleRateto simplify the logic in your test cases.
Part Two: Implement the Tone Matrix
You now have a working string instrument simulation. Your next task is to implement the ToneMatrix type, which will maintain a grid of lights, respond to user input, determine when to pluck each string, and decide what data gets sent to the computer speakers.
Here's how ToneMatrix is defined:
public class ToneMatrix {
    /**
     * Creates a Tone Matrix whose grid is gridDimension x gridDimension
     * and where each light in the matrix has size
     * lightDimension x lightDimension.
     */
    public ToneMatrix(int gridDimension, int lightDimension) { ... }

    /* Reacts to the mouse being pressed at a given location.
     * Specifically, this toggles the state of the light under the
     * mouse.
     */
    public void mousePressed(int mouseX, int mouseY) { ... }

    /* Reacts to the mouse being dragged at a given location (moved
     * while pressed). Specifically, this updates the light under the
     * mouse to match the state of the light where the mouse was
     * last pressed.
     */
    public void mouseDragged(int mouseX, int mouseY) { ... }

    /* Draws the Tone Matrix to the screen. Details are given later. */
    public void draw(ToneMatrixGraphics graphics) { ... }

    /* Advances time forward one step, returning the next sound
     * sample to play. Details are given later.
     */
    public double nextSample();

    /* Described later. */
    public void resize(int newGridSize);

    /* How big each light in the tone matrix is. */
    int lightSize;

    /* The 2D grid of lights in the matrix; details are given below. */
    boolean[] grid;

    /* The instruments corresponding to each row. */
    StringInstrument[] instruments;

    /* Additional fields and methods of your own choosing;
     * you're free to add extra information here if you'd
     * like.
     */
}
We've broken the task of implementing this type down into five smaller milestones to be completed in sequence.
Milestone One: Implement Constructor and mousePressed
Your first task is to implement the constructor and the method ToneMatrix.mousePressed.
As a reminder, the Tone Matrix is a square grid of lights, all initially off. The gridDimension parameter to the constructor determines how big the grid of lights should be; specifically, the grid will have dimensions gridDimension × gridDimension. You can assume gridDimension is greater than or equal to one.
When drawn to the screen, each of those lights renders as a square of some size. The dimensions of each light is specified as an argument to the ToneMatrix constructor. Store this information in the lightSize field. You'll need this later to react to the mouse and draw the Tone Matrix on screen. You can assume lightSize is greater than zero.
Your constructor also needs to store the state of each of the gridSize × gridSize lights. In principle, you could do this with a boolean[][] 2D array, where true indicates a light is on and false indicates it's off. However, on this assignment, we'd like you to see just how powerful 1D arrays are, so you will store the grid of lights as a boolean[] 1D array as the grid field of ToneMatrix.
You might be wondering how you would represent a two-dimensional grid using a one-dimensional array. This can be done by as follows: the first gridSize elements of the array correspond to the first row of the matrix, the next gridSize elements correspond to the second row of the matrix, etc. (4). Here's an example of this idea applied to a
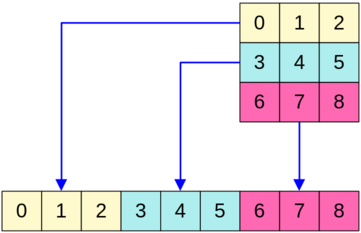
There is a nice formula that maps from a row/column position in the 2D grid to an index in the 1D array. Given an
You will also need to initialize an array of StringInstruments in the ToneMatrix constructor. The Tone Matrix plays music by associating each row with a StringInstrument. The instruments data member has type StringInstrument[], perfect for pointing at an array of instruments. To determine the frequency of the instrument of a given row, call the function frequencyForRow defined in ToneMatrix.java.
Finally, let's talk about mousePressed. This function is called by the graphics system whenever the mouse button is pressed inside the Tone Matrix. The function's arguments, mouseX and mouseY, give the position where the mouse is pressed, relative to the upper-left corner of the Tone Matrix. For example, if the mouse is pressed at the top-left corner of the Tone Matrix, mouseX and mouseY will be 0. If mouseX is 137 and mouseY is 106, it means that the mouse was pressed 137 pixels to the right of the top-left corner of the matrix and 106 pixels down.
Your mousePressed function should do the following. First, you should figure out, based on mouseX and mouseY, which light in the grid the mouse was pressed on. As a hint, you know how big each cell is (it's a square whose size is lightSize × lightSize), and you should not need to do any complicated math. Next, you should toggle the state of that light: turn the light on if it's off, and turn the light off if it's on.
We have provided you with a battery of test cases you can use to validate your implementation. Because this is the first milestone in working with the ToneMatrix type, you don't need to write any of your own test cases here, though we think you may find it useful to do so. We suggest you read over our test cases to see how we call the functions of ToneMatrix to make changes to the grid of lights.
To summarize, here's what you need to do:
Milestone 1 Requirements
-
Implement the
ToneMatrixconstructor and andmousePressedmethod inToneMatrix.java. -
Use our provided test cases to validate that your code works correctly. You should pass all the tests for Milestone One and fail all the other tests.
Some notes on this problem:
-
You must not use any collections classes (e.g.
ArrayList,HashMap, etc.) when coding up these methods. (More generally, these types are not permitted in this assignment.) -
Be careful working with row/column coordinates and
-
You can assume that the mouse is indeed hovering over a light; you don't need to worry about negative
-
You are welcome to add extra helper methods to the
ToneMatrixtype if you would like. However, for this milestone, do not add any new fields.
Milestone Two: Implement mouseDragged
Your next task is to implement ToneMatrix.mouseDragged. This function is called by the graphics system whenever the mouse is moved over the Tone Matrix with the mouse button down. The mouseDragged function is only called after an initial mousePressed is called, and it's assumed that each mouseDragged is part of a sequence of mouse movements that started with the most recent call to mousePressed.
Like mousePressed, mouseDragged takes in two integers mouseX and mouseY indicating where the mouse was dragged within the Tone Matrix, relative to the Tone Matrix's upper-left corner. Like mousePressed, mouseDragged updates the state of the light directly under the mouse. However, the way mouseDragged does this is different. Specifically:
-
If the last time
mousePressedwas called a light was turned on, then the light under the mouse inmouseDraggedturns on. -
If the last time
mousePressedwas called a light was turned off, then the light under the mouse inmouseDraggedturns off.
This has a nice, intuitive feel to it: if the user clicks on a light to turn it on and then drags the mouse around, every light they move the mouse over will turn on. If they click on a light to turn it off and drags the mouse around, then every light they move the mouse over will turn off.
In order to do this, mousePressed will need to communicate information into mouseDragged so mouseDragged knows what to do. The proper way to do this is to add one or more additional fields to the ToneMatrix type. The mousePressed method can then write information to those data members that is then read later by mouseDragged. We will leave it up to you to decide what information you want to remember this way; there are many good choices.
As part of completing this milestone, you will need to edit functions you have already written in the last milestone. You will need to update mousePressed, and, depending on your implementation, you might need to update the constructor. (The two simplest strategies we know of do not require updates to the constructor, though.)
Because you are changing code you have already written, you may accidentally introduce bugs into previously working code. Such bugs are called regressions. Fortunately, we've provided a lot of test cases for Milestone One, so if your code changes break anything, there is a good chance that those test cases will flag the error. If you start failing tests for Milestone One, investigate and see if you can identify what change you made that caused the regression.
We have provided a few test cases for this milestone, but they're not as extensive as what we gave you for the first milestone. You will therefore need to write some test cases of your own to help check that your code works as intended. Specifically, you should write at least two new test cases: one that ensures mousePressed updates the internal state of ToneMatrix appropriately, and one that ensures that mouseDragged performs as intended. You may want to refer to our provided tests for guidance on how to design such test cases.
To summarize, here's what you need to do:
Milestone 2 Requirements
-
Implement
mouseDraggedinToneMatrix.java. In doing so, you will need to add one or more fields toToneMatrix, and you will need to update your implementation ofmousePressedfrom the previous milestone. -
Write at least one custom test case for
mousePressedand at least one custom test case formouseDragged, and ideally more. Use your tests, plus our provided test cases, to validate that your code works correctly. You should pass all the tests for the first two milestones and fail all tests for the later milestones.
Some notes on this problem:
-
You must not use any collections classes (e.g.
ArrayList,HashMap, etc.) when coding up these functions. -
Be aware of variable shadowing. If you declare a field inside a
classand then have a local variable with the same name inside a method implementation, then the name of that variable will refer to the local variable, not the data member. For example, if you have a field namednumSmilesinToneMatrixand declare a local variablenumSmilesinsidemousePressed, then any code using the namenumSmilesinsidemousePressedwill refer to the local variablenumSmilesrather than the fieldnumSmiles. -
You do not need to handle the case where
mouseDraggedis called beforemousePressedis. However, your code formouseDraggedshould work correctly if there were several different calls tomousePressedthat precede it. In that case, you should always focus on just the last call tomousePressed. -
You should not need to write that much code inside
mousePressed. If you find yourself having to significantly overhaulmousePressed, it may indicate that you are overcomplicating the design. -
Feel free to add additional helper methods to the
ToneMatrixtype. You may find that there is a good deal of code overlap betweenmousePressedandmouseDragged. -
The computer only periodically reads the state of the mouse and calls
mouseDragged. This means that if the user moves the mouse quickly from one point to another, the mouse may appear to "jump" from the initial point to the destination. This can cause the mouse to skip over lights in the Tone Matrix. You do not need to worry about this; just havemouseDraggedfocus on the light directly under the mouse when the function is called.
Milestone Three: Implement draw
Your next task is to implement ToneMatrix.draw(), which draws the lights of the Tone Matrix. This method takes as input a ToneMatrixGraphics object, which provides a single method to you:
public interface ToneMatrixGraphics {
    void drawRectangle(int x, int y, int width, int height, Color color);
}
This function draws the specified rectangle on screen with the given color. As usual, the coordinate system we use has (0, 0) at the top-left corner of the screen with
Your ToneMatrix.draw() will need to compute the rectangular bounding boxes for all the lights in the grid, then call drawRectangle passing in those rectangles and the appropriate colors. (We have provided you two color constants, LIGHT_ON_COLOR and LIGHT_OFF_COLOR, for this purpose.) You should assume the upper-left corner of the Tone Matrix is at position (0, 0) and that each light is a perfect square whose size is lightDimension × lightDimension.
Because it's a bit tricky to test what rectangles were drawn on screen, we have provided you with test cases for this milestone. You do not need to write your own test cases, but you are welcome to do so if you'd like.
To summarize, here's what you need to do:
Milestone 3 Requirements
-
Implement
drawinToneMatrix.java. -
Use our provided test cases to validate that your code works correctly.
Some notes on this problem:
-
You must not use any collections classes (e.g.
ArrayList,HashMap, etc.) when coding up this method. -
You should not need to update any methods you've written previously, and you should not need to add any new fields.
-
You are welcome to add new methods if it would be helpful.
Milestone Four: Implement nextSample()
Your next task is to get the Tone Matrix to actually send sound to the computer speakers.
The hardware inside computer speakers periodically asks the computer for samples to play. In this assignment, the speakers will call the function ToneMatrix.nextSample() every time they need another sound sample to play. Whatever you return from this function will thus be played on your speakers. (5)
Like StringInstrument.nextSample(), this function needs to both determine what sound sample gets sent to the speakers and make appropriate updates to the internal state of the Tone Matrix. At a high level, nextSample() should do the following in the following order:
-
Determine whether it's time to pluck more strings and, if so, pluck the appropriate strings.
-
Add up the samples returned by all the strings and send that to the speakers.
We'll begin by discussing when to pluck the strings. As you saw from the constructor, the Tone Matrix maintains an array of StringInstruments, one per row of the matrix. Imagine there's an arrow at the bottom of the Tone Matrix, initially pointing at the leftmost column. Most of the time nextSample() is called, that arrow remains in place. However, on the very first call, and every 8,192nd call after that (6), two things happen.
-
The Tone Matrix plucks strings. Specifically, it looks at the column pointed at by the arrow, finds all rows in that column that are lit up, and plucks the string corresponding to each of those rows.
-
The arrow moves one column to the right, wrapping around back to the start if necessary.
Next, let's talk about how nextSample() determines its sound sample. After deciding whether to pluck any strings, the Tone Matrix calls nextSample on each of its StringInstrument, adds the values together, and returns the sum as the sample to play. (7) Because calling nextSample() on an unplucked StringInstrument always returns 0, strings that haven't been plucked will not contribute to the generated sound. Similarly, since vibrating strings quiet over time, strings that haven't been plucked in a long time will contribute negligibly to the overall sound.
To make this work, you will need to add at least one (and possibly more) fields to the ToneMatrix type. We're going to leave the design up to you; there are many options and you're free to choose whichever one you'd like.
Because you will be adding new data members to ToneMatrix, you will need to add at least one test case to make sure that the new data members are properly initialized. You will also need to write at least one test case to make sure that nextSample() keeps track of the progress of time correctly and remembers what the current column is. We have provided some test cases that check whether the correct strings are plucked; the logic to check for this is much more involved and so we'll take care of it for you.
To summarize, here's what you need to do:
Milestone 4 Requirements
-
Implement
nextSample()inToneMatrix.java. This will require adding fields to theToneMatrixtype, and may require you to update your constructor. -
Write at least one custom test case that checks whether your new fields are initialized correctly when a new
ToneMatrixis constructed. -
Write at least one custom test case that checks whether your implementation correctly keeps track of the current column and how many more calls to
nextSample()need to elapse before the column advances. -
Use our provided test cases, plus your own custom tests, to validate that your code works correctly.
Some notes on this problem:
-
You must not use any collections classes (e.g.
ArrayList,HashMap, etc.) when coding up this method. -
You do not need to write much code here. If things are starting to seem complicated, pause, back up, and see if you can find an easier approach.
-
Feel free to write as many additional helper methods as you'd like.
Milestone Five: Implement resize()
Your final task is to implement the ToneMatrix.resize function. This function takes as input an int called newGridSize and changes the dimensions of the grid of lights to that new size. (If newGridSize is zero or negative, you should throw a RuntimeException because that's not a valid grid size.) For example, you can use this function to change the grid size from
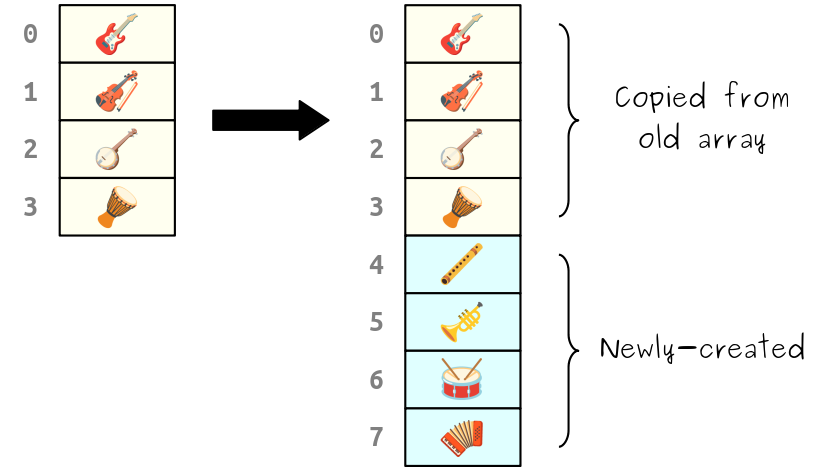
First, because each row of the Tone Matrix has a StringInstrument associated with it, this will entail changing the number of total StringInstruments. You should create a new array of StringInstruments of the new size. Copy over as many of the existing StringInstruments as you can, and fill in the remaining rows with new StringInstruments whose frequencies are determined by the frequencyForRow function.
Here's an illustration. Suppose the Tone Matrix was originally of size StringInstruments. If we were to resize the Tone Matrix to size StringInstruments, filling in the remaining rows with newly-created StringInstruments: (8)
On the other hand, if we were to resize the grid from StringInstruments and discard the remaining four.
Next, you will need to resize the underlying light grid. You should do as follows: any lights present in both the new and the old grid should retain their previous values, while any new lights will initially be turned off. For example, here's what it would look like if we resized a
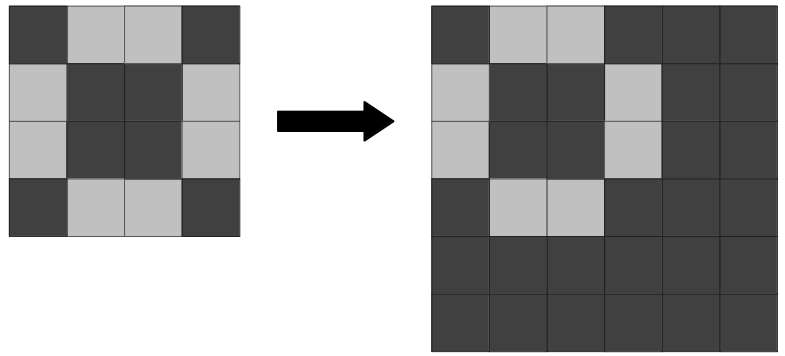
On the other hand, if you were to resize a
Be careful how you copy old grid values to the new grid. Each grid is represented as a 1D array, and the formula that converts between 1D indices and 2D indices depends on the grid size. This means that when copying lights over, the source and destination indices will not necessarily be the same.
The last step in resizing the grid is to reset the left-to-right column scan done by nextSample(). In particular, whenever resize is called, you should move the arrow sweeping across the columns so that it's back at the leftmost column, and the very next call to nextSample() should be treated as one of those special, every-8,192th calls that plucks the strings. So for example, if nextSample() has been called 5,000 total times and then resize() is called, then the 5,001st call to nextSample() should pluck the strings of the first column, and every 8,192nd call after that will pluck the strings from the subsequent columns.
To recap, here's what you need to do:
Milestone 5 Requirements
-
Implement
resize()inToneMatrix.java. -
(Optional, but recommended.) Add your own test cases to ensure your implementation works correctly.
-
Use our provided test cases, plus you own custom tests if you chose to write them, to validate that your code works correctly.
Some notes on this problem:
-
You must not use any collections classes (e.g.
ArrayList,HashMap, etc.) when coding up this method. -
Don't forget to throw an exception if the new size is zero or negative.
-
Feel free to write as many additional helper methods as you'd like. Each of the three steps here - resize the instruments array, change the grid size, and reset the sweep - are independent of one another.
(Optional) Milestone Six: Enjoy Your Creation!
Congratulations! You have just created a digital musical instrument from scratch. Everything you see on the screen, every way in which the program responds to the mouse, and all the sound emitting from your speakers is fully your own. You didn't rely on any existing libraries in the course of coding this up, and aside from a little bit of glue code to connect ToneMatrix to Java's windowing and audio systems, we didn't do any of the heavy lifting for you. This really is your own handiwork!
So take some time to play around with what you made by running the ToneMatrix demo program. Can you make any cool tunes or rhythms? Are there any patterns that sound particularly aesthetically pleasing?
Good luck, and have fun!
(1) Examples of plucked string instruments are the guitar, the oud, the sarod, the qanun, the harp, etc. Contrast this with bowed string instruments like the violin, cello, or igil.
(2) We arrived at the values +0.05 and -0.05 here through experimentation with the finished Tone Matrix. Those values are totally arbitrary. Also, in the original version of this algorithm, the array would be filled with white noise, random values from -0.05 to +0.05. When prototyping this assignment, we experimented with a number of different wave shapes and found that for our purposes the square wave was more aesthetically pleasing.
(3) The value 0.995 here is arbitrary and arrived at by trial-and error. Increasing this value causes the amplitude of the wave to decay more slowly over time, resulting in a longer, ringing note. Decreasing this value cases the amplitude of the way to decay more quickly, resulting in less resonance and more of a "plunking" sound.
(4) This method of laying out a 2D grid inside a 1D array is called row-major order and is commonly used to represent 2D arrays as 1D arrays.
(5) Here's the full technical lowdown of how this works. Computer speakers internally have a memory buffer, which is essentially just an array holding the next sound sample to play. As the speakers play, they consume what's in this array and generate sound. When the buffer is running out of samples, they call the operating system to request that a new buffer be filled up with samples. The OS in turn notifies your program that it needs to fill up the buffer. We have set up some glue code that fills the buffer by repeatedly calling ToneMatrix.nextSample(). You can see how this works in ToneMatrixGUI.java if you're curious.
(6) The number 8,192 is purely arbitrary here. We picked it because it's a nice round number
(7) When you add together multiple sound samples, the resulting value can be bigger than +1 or lower than -1. Since
(8) "Hey!," you might be saying, "the instruments in your schematic aren't all string instruments!" Yes, you're right. Unfortunately, there are only so many string instruments for which we have emojis. Sorry.