Student Handout
AI in Orbit: Intelligent Classification of Space Weather Events with Machine Learning
In this lesson, students will explore the world of space weather through engaging, hands-on activities that combine coding and machine learning. Using Google's Teachable Machine, they'll train models to recognize different kinds of space weather and its effects on Earth, like solar flares, auroras, or GPS and electrical blackouts. Next, they'll make their models come alive by adding them to a simple web app. To take it a step further, students will get the chance to tinker with the HTML and JavaScript behind the app, discovering how machine learning connects with real-world coding and how they can shape digital tools to match their own creative ideas.
What is machine learning?
Machine learning (ML) is a method that enables computers to "learn" from data, much like humans learn from experience. Instead of being told exactly what to do step-by-step, a computer looks at lots of examples and figures out how to make decisions or predictions on its own.
For example, if you show a computer thousands of pictures of bananas and apples, it can learn to distinguish between them. The more examples it sees, the better it gets. This is similar to how humans improve at a particular skill with constant and consistent practice. Here are some ways that ML is used in the apps and services we use every day:
- Recommendations for songs, movies, or videos based on what you've liked in the past and what other users with similar tastes have liked.
- Choosing what ads, posts, or products to show a user on a social media app based on what they like and how they act.
- Speech recognition and natural language understanding in voice assistants are essential for accurately understanding and executing user commands.
- Keeping an eye on things like heart rate and blood sugar levels in real time, finding patterns, and making predictions about health problems.
Teachable Machine by Google
Teachable Machine is a free, accessible, web-based tool that enables anyone to create machine learning models without needing to know how to code. With its drag-and-drop interface and simple controls, it's easy for anyone to create their own ML models. It's capable of using various forms of input to train models, such as pictures, sounds, or even human poses. The models created are easily exportable and can be used in custom websites and apps - the possibilities are endless!
An introduction to space weather
We all know that Earth has weather, but did you know that space has weather as well? Space weather is very different from regular weather, since it is caused directly by the star in the center of our solar system: the Sun. While regular weather events, such as thunderstorms and hurricanes, are localized to particular areas on Earth, Space weather can affect our entire planet in some quite unique and drastic ways. This could include disrupting radio communication, GPS systems, and interfering with various types of electronics.
One of the most famous events related to space weather affecting us is the Carrington event of 1859. A powerful geomagnetic storm caused by a massive coronal mass ejection (CME) from the Sun struck the Earth's magnetosphere. It resulted in spectacular auroras seen at low latitudes and caused widespread disruption of telegraph systems, with some stations experiencing electrical fires. The event highlighted the vulnerability of technological systems to solar activity, raising awareness about the potential impacts of space weather.
Scientists and engineers have been busy protecting and upgrading our infrastructure for decades to help mitigate the issues caused by space weather. Have you ever heard about space weather in school? There's a good chance you haven't, since most states don't include it as part of their K-12 scientific curricula.
Some examples of space weather events
| Description | Image |
|---|---|
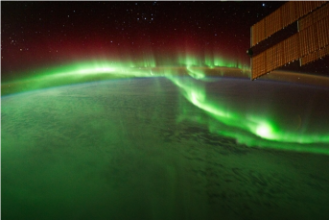
| Auroras (Northern and Southern Lights): Bright lights in the sky near the poles that are caused by charged particles from the Sun hitting the Earth's atmosphere. The more solar activity, the more brilliant the display. Sometimes the amount of energy released by the sun is so intense, auroras can be seen closer to the equator! |
 |
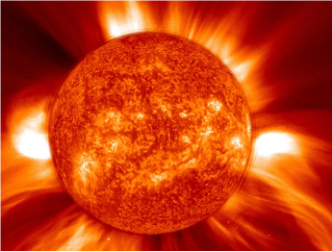
| Coronal Mass Ejections (CMEs): These are huge clouds of charged particles that the Sun sends out. When they hit Earth's magnetic field, they can cause geomagnetic storms. |
 |
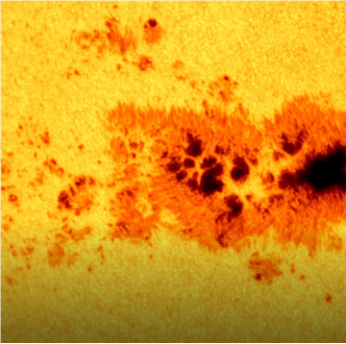
| Sun Spots: Temporary, dark patches on the Sun’s surface that are cooler than the surrounding areas. They appear dark because they are regions where intense magnetic activity inhibits the flow of hot plasma, lowering their temperature. |
 |
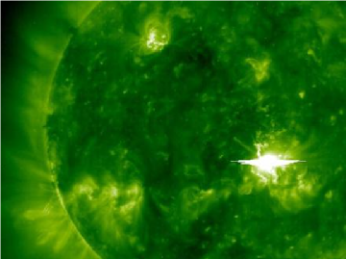
| Solar Flares: Sudden, intense bursts of energy and radiation originating from the Sun’s surface, often near sunspots. They can release massive amounts of electromagnetic energy, which can disrupt communications and navigation systems on Earth. |
 |
Some examples of space weather effects on Earth
| Description | Image |
|---|---|
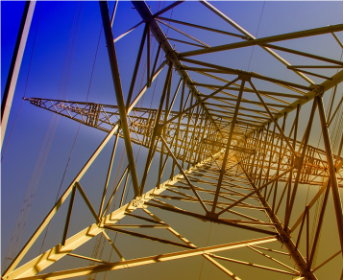
| Power Grid Disruptions: Strong geomagnetic storms can induce currents in power lines, potentially damaging transformers and causing large-scale blackouts. |
 |
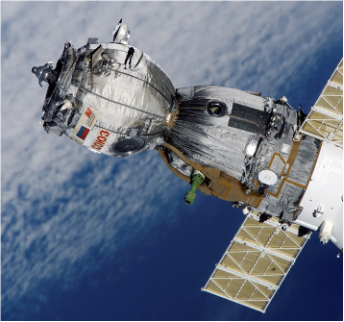
| Satellite Malfunctions: Increased radiation and energetic particles can disrupt satellite electronics, degrade solar panels, and even cause satellites to malfunction or fail. This includes satellites used for communication or weather prediction. |
 |
| Communication Interference: Solar weather can disturb the Earth’s ionosphere, leading to disruptions in radio, GPS, and other communication signals. |
 |
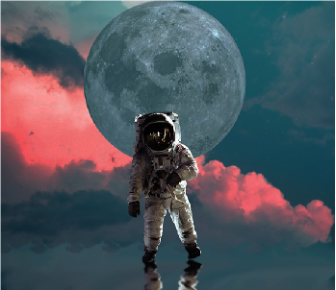
| Increased Radiation Exposure: High-altitude flights and astronauts may be exposed to elevated levels of radiation during solar storms, posing health risks. |
 |
Part 1: How to train a Machine Learning algorithm on Teachable Machines
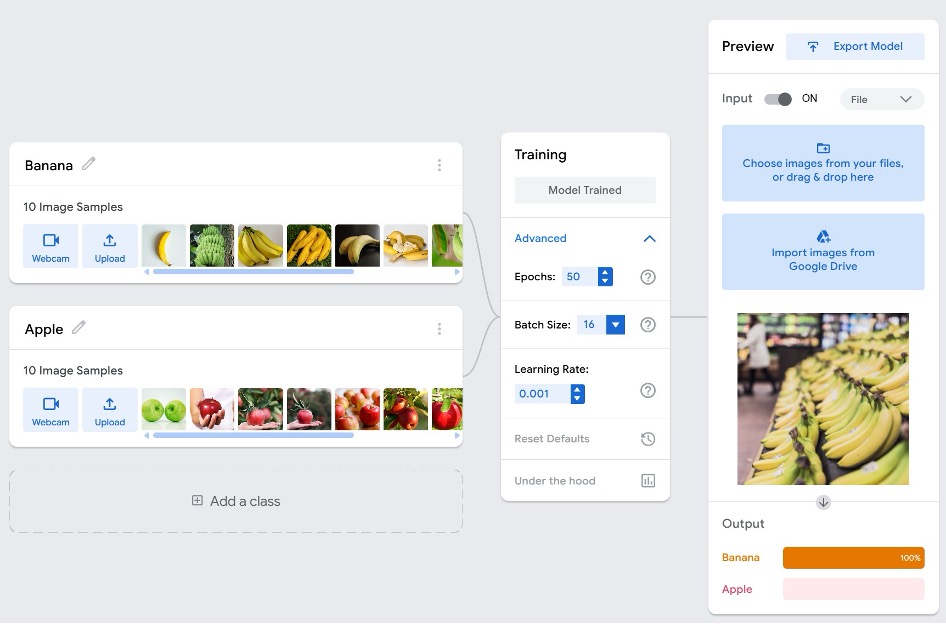
We’ve gathered folders of royalty-free pen and scissors images for you to use to train your model. You can find them in the training images folder . If you want something a little more fun, we’ve also uploaded images at the link above for an apple vs. banana comparison! Feel free to use something even more exciting if you want - pizza vs chicken nugget, can vs bottle, etc.
Part 2: Step-by-step instructions for training your model
| Step | Instructions |
|---|---|
| 1 | Go to https://teachablemachine.withgoogle.com/. There are currently three types of models you can train: image, audio, or pose. Create an image project. The “standard” image model is fine. |
| 2 | You will see what looks like a flow chart, with two starting “classes” - Class 1 and Class 2. A class is a category or classification that an ML algorithm tries to predict. In this case, we are training an algorithm to recognize pens vs. scissors. Go ahead and rename those classes to Pen and Scissors. |
| 3 | Teachable Machines allows you to either upload images or use a webcam to take pictures. If you prefer to do it live, you can use a webcam to capture different pictures of pens and scissors you have on hand. Try to use as plain of a background as possible, or the ML algorithm might get distracted/confused by extraneous shapes or colors. Click the upload buttons and upload 10 out of the 11 images to train your ML models. 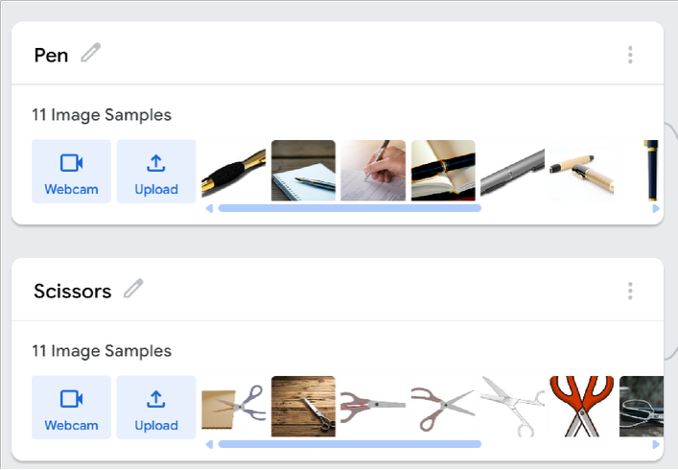 |
| 4 | Now it’s time to train the model. There are advanced options available, but the defaults are fine for now. Click the button to train your model! This might take a few moments… |
| 5 | After your model is trained, try the preview feature. This is where we can see if the ML algorithm works! There are two options. Try them both! a) Use your webcam to see if the ML algorithm can properly recognize your pen or scissors! Tip: Use as plain of a background as possible to eliminate any distractions that could trick the algo. b) Use the 11th image from each folder to see if it gets classified correctly under the output section. The percentage is the confidence that the algo has in its classification decision. 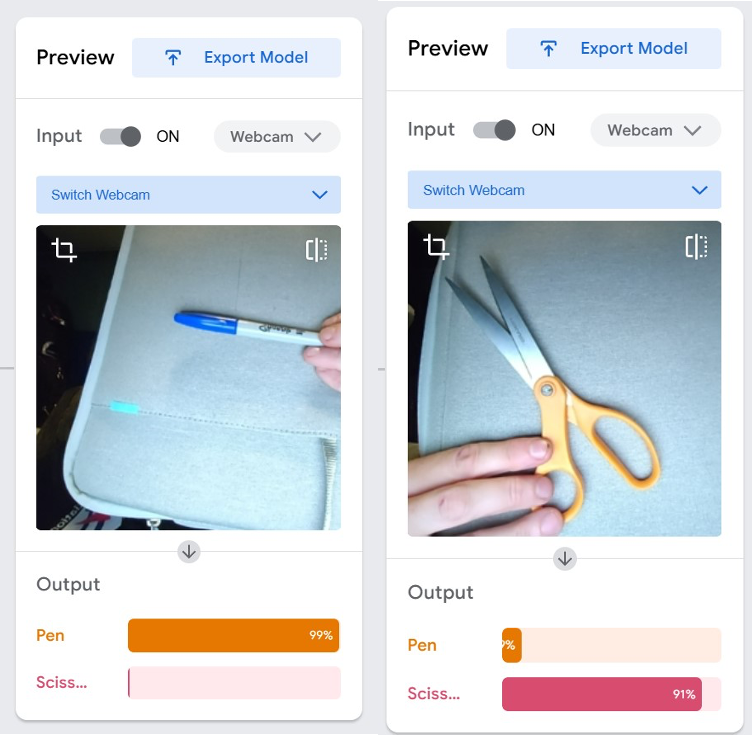 |
| 6 | Congratulations, you’ve just trained an ML model! The more data that you can feed into your models - whether its images, sounds, or poses - the more accurate it will become. Tip: You might notice that when you are not actively testing one of your classes (a pair of scissors or pen), your ML algo might tend to favor one classification over the other. If desired, make a third class for none. This class would just consist of images of your blank background. Then, when nothing is actively being tested, hopefully your ML algo chooses the none class! |
| 7 | Next, export your model. The default settings are the best. We will be using the TensorFlow.js model via a shareable link. Make sure to click the Upload my model button. Make sure to save your custom link for the next step in the project - coding a webpage that uses your ML model! Your model URL will look something like the following. Your unique code will look like the highlighted text: https://teachablemachine.withgoogle.com/models/QFaWrfsOI/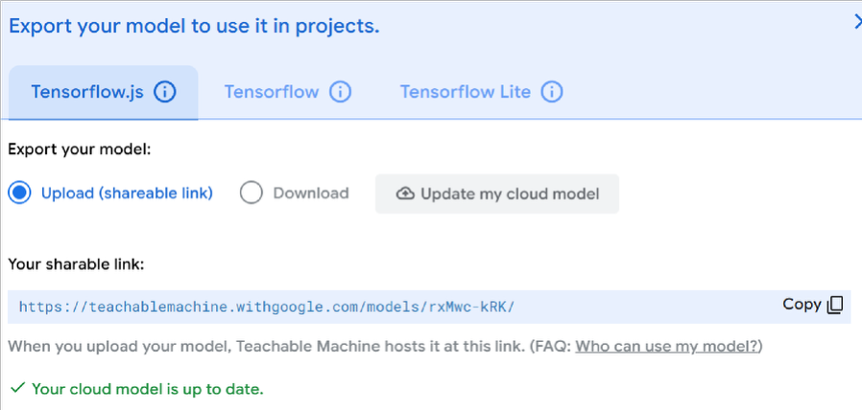 |
How to find or create images for machine learning
There are many images available from scientific sources:
- NASA Scientific Visualization Studio (SVS)
- NASA Goddard Space Weather Laboratory
- NOAA NESDIS Space Weather Downloads
- NOAA Space Weather Prediction Center (SWPC)
- GOES Solar Ultraviolet Imager (SUVI)
- SOHO LASCO Coronagraph
- Parker Solar Probe Multimedia
Part 2: Coding a webpage to run your model outside of Teachable Machine
Let’s code a webpage utilizing the model that you just created. Again, make sure that you have saved your link from the ML training above. We recommend using Visual Studio Code for this task: https://code.visualstudio.com/
You will also need to be running a local webserver. This is simple to do within Visual Studio Code. You will need to install an extension. Here are suggestions:
-
Install Python and spin up a live server by running the following command in a VS Code terminal:
python -m http.server 8000
Then, open your browser and go tohttp://localhost:8000 -
Install the Live Server extension by Ritwick Dey. Read the instructions to load your local webserver.

You will find two webpages within the code folder found here. The webpages consist of basic HTML and JavaScript coding.
- webcam.html — This webpage will run a webcam automatically. It will then display the model’s prediction as to what it is seeing via the live webcam.
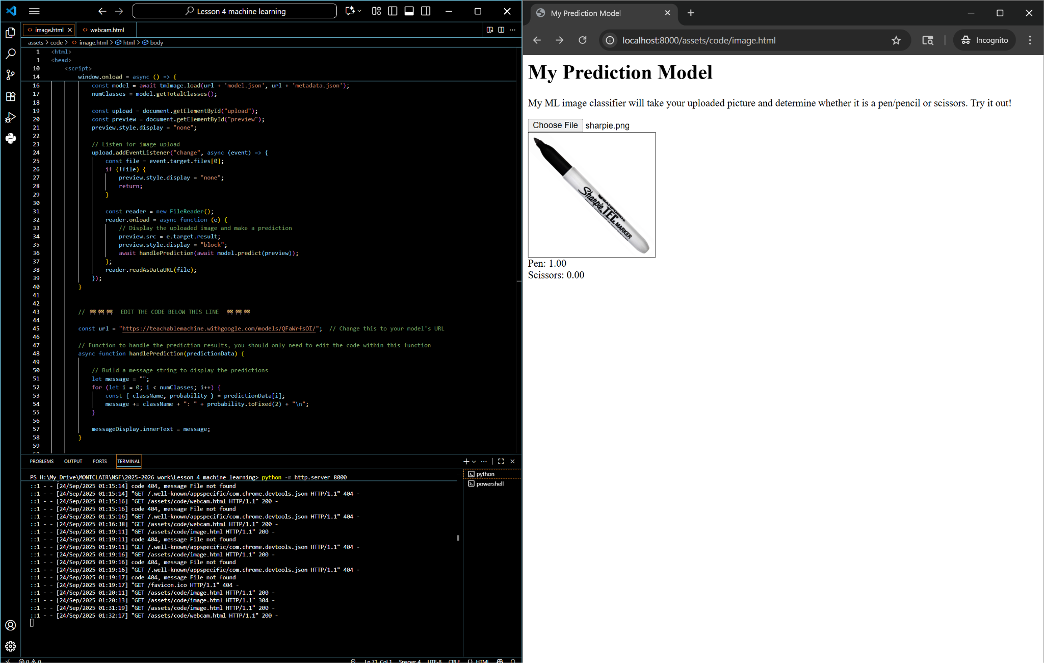
- image.html — This webpage will allow the user to upload an image. It will then display the model’s prediction based on what it sees in the image.
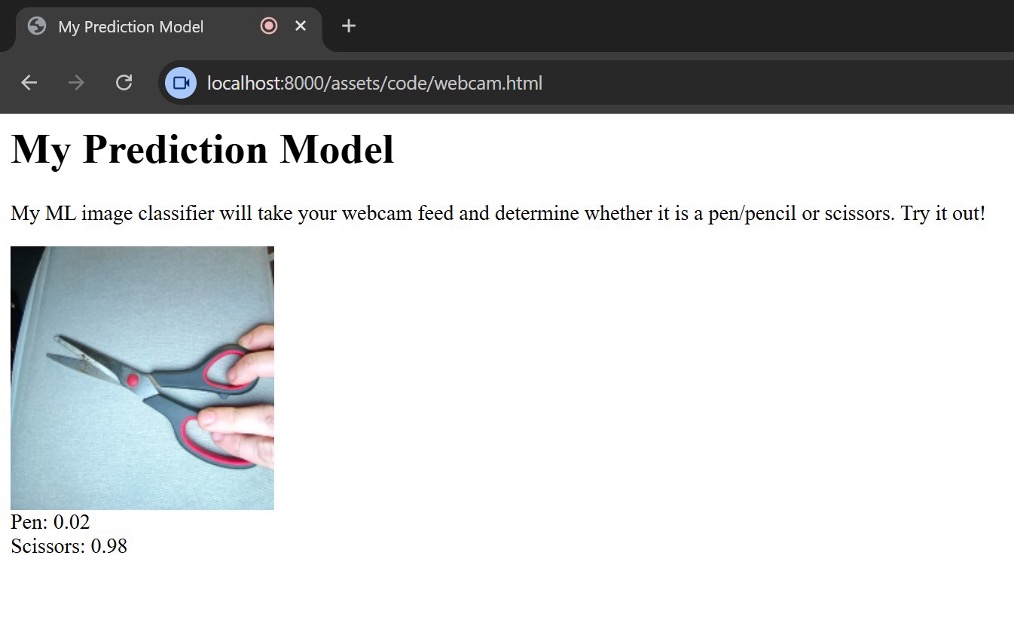
Running webcam.html
After starting your webserver, and placing webcam.html in your project, you should be able to view the page in your web browser at an address like http://localhost:8000/webcam.html. This webpage will automatically open up a webcam and make live predictions as to what it is seeing. If you run the code as-is it will use my pen/scissors model. To update it to your model, edit the url variable that is defined under the following comment:

The handlePrediction JavaScript function explained
Both webpages use the same function to make predictions:
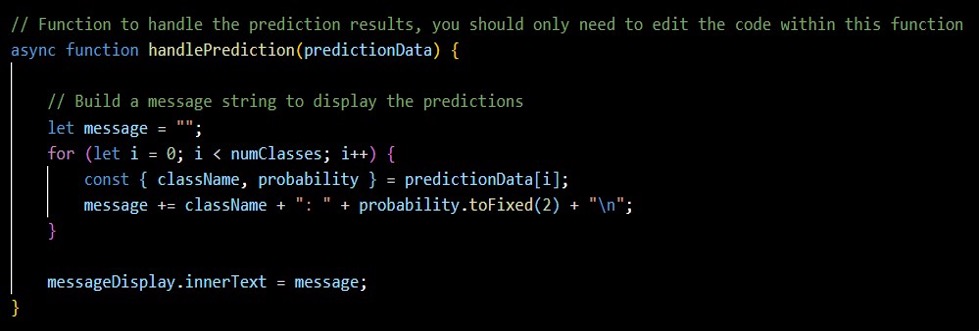
In webpage.html, this function is continually called to keep up with the webcam, up to 60 times per second! In image.html this function is called whenever a new image is uploaded.
The predictionData argument passed into handlePrediction is an array that contains objects that look like this:
[
    { className: "Pen", probability: 0.8520193 },
    { className: "Scissors", probability: 0.1479807 }
]
The numClasses variable will store the total number of classes within your model. In the case of our pen/scissors example, this number will be 2. Be aware that a model can have tens or hundreds of classes if desired! numClasses will be equal to the length of the predictionData array.
The message variable starts life as an empty string. As each class is looped through, the message string is built to contain the name of each class along with the predicted probability for the image being analyzed. This string is then displayed on the messageDisplay div located within each webpage.
Coding challenges for students
Based on your experience level, try some of the following coding challenges:
For absolute non-coders and beginners
- Just getting it all running as-is is a challenge in itself. So, congratulations!
- Look through the code for the words that you see displayed on the webpage, such as “My Prediction Model”. Customize this text for your particular ML experiment. This will involve editing basic HTML code.
- Change the name of a variable in the handlePrediction function. Be careful, you must be consistent; otherwise, the code will break.
For more advanced students
- Look through the handlePrediction JavaScript function. The for loop uses the message variable to build a string. This string displays the prediction results to the user. How might you customize the text that displays?
- Can you change the for loop to use a while loop instead?
- The probabilities are currently displayed as decimals, such as 0.92. How might you convert this to percentages, such as 92%?
- Go back to your model and add a new class of image. You can have more than two! Integrate this into your webpage.
- The webpages are very plain. Google “Basic CSS for webpages” and see if you can apply any styles (like color or fonts) to your webpage to make it look cooler.
- Use if/else statements to add messages about how confident your model is when analyzing a particular image.
- If you are getting results like 0.60/0.40, add a message indicating that your model is having issues properly classifying what it sees.
- If you get results like 0.99/0.01, add a message indicating that your model appears to be very confident.
Important Tips for Testing Your Code
- After making changes to your webpage code, always click the refresh button in your browser to view the updated results.
- If you want to explore further, you can open the developer tools built into your browser (right-click → “Inspect” or press F12) to see errors, debug your code, or experiment with styles.
- For a smooth workflow, keep VS Code open on one side of your screen and your web browser on the other. This way, you can edit code and instantly refresh to test your changes.