Blocky
Learning goals
By the end of this assignment, you should be able to:
- model hierarchical data using trees
- implement recursive operations on trees (both non-mutating and mutating)
- convert a tree into a flat, two-dimensional structure
- use inheritance to design classes according to a common interface
Introduction: the Blocky game
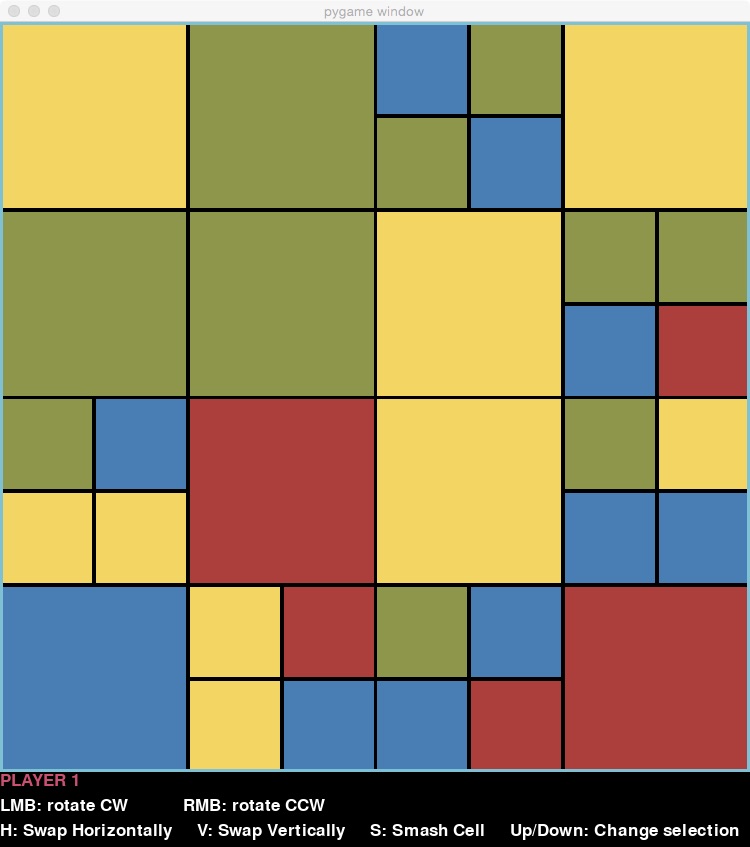
Blocky is a game with simple moves on a simple structure, but like a Rubik’s Cube, it is quite challenging to play. The game is played on a randomly-generated game board made of squares of four different colours, such as this:
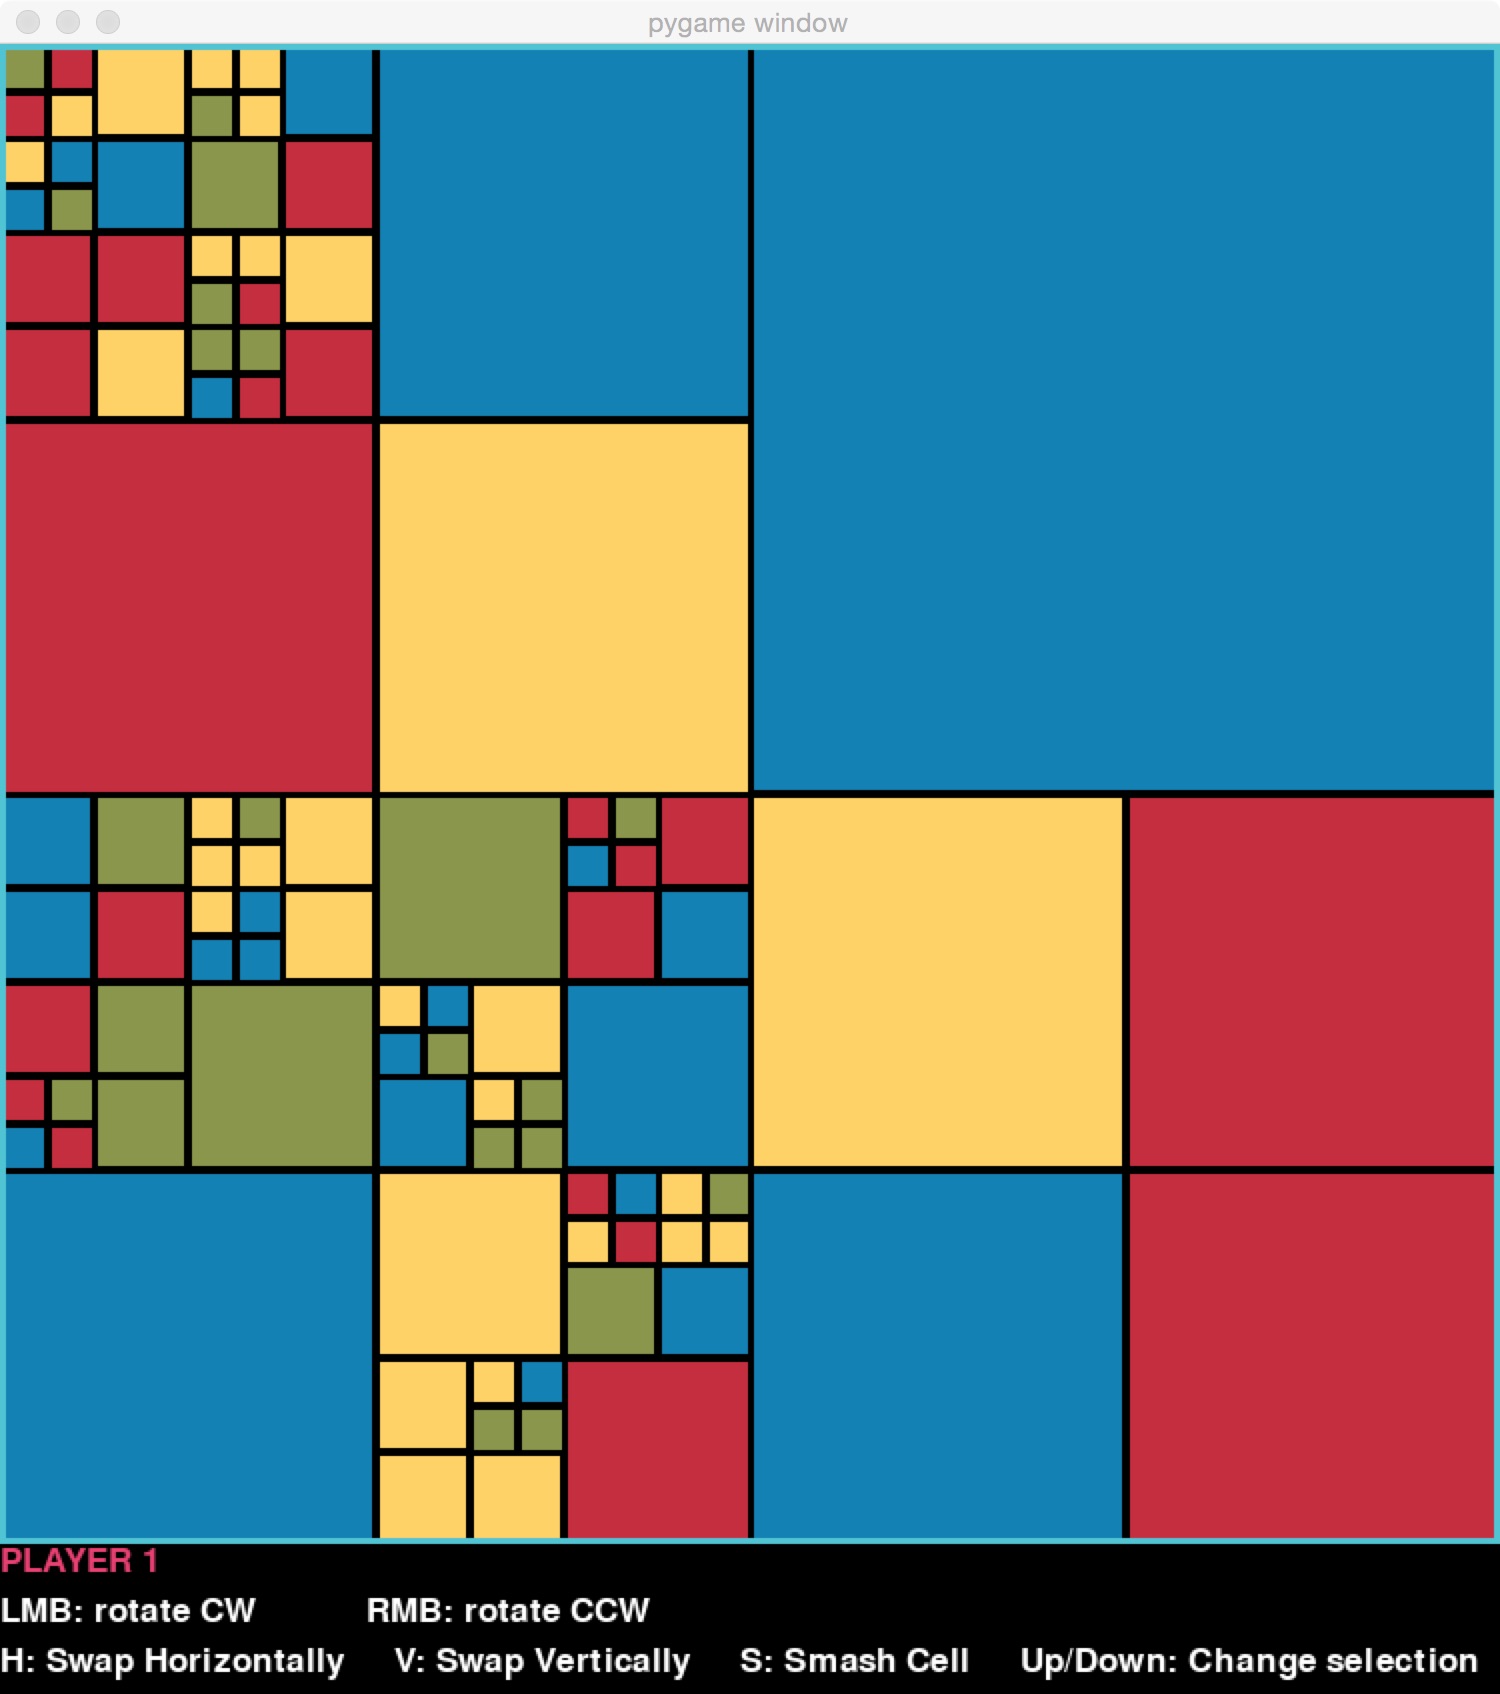
Each player has their own goal that they are working towards, such as creating the largest connected “blob” of blue. After each move, the player sees their score, determined by how well they have achieved their goal. The game continues for a certain number of turns, and the player with the highest score at the end is the winner.
Now let’s look in more detail at the rules of the game and the different ways it can be configured for play.
The Blocky board
We call the game board a ‘block’. It is best defined recursively. A block is either:
- a square of one colour, or
- a square that is subdivided into 4 equal-sized blocks.
The largest block of all, containing the whole structure, is called the top-level block. We say that the top-level block is at level 0. If the top-level block is subdivided, we say that its four sub-blocks are at level 1. More generally, if a block at level k is subdivided, its four sub-blocks are at level k+1.
A Blocky board has a maximum allowed depth, which is the number of levels down it can go. A board with maximum allowed depth 0 would not be fun to play on – it couldn’t be subdivided beyond the top level, meaning that it would be of one solid colour. This board was generated with maximum depth 5:

For scoring, the units of measure are squares the size of the blocks at the maximum allowed depth. We will call these blocks unit cells.
Choosing a block and levels
The moves that can be made are things like rotating a block. What makes moves interesting is that they can be applied to any block at any level. For example, if the user selects the entire top-level block for this board:
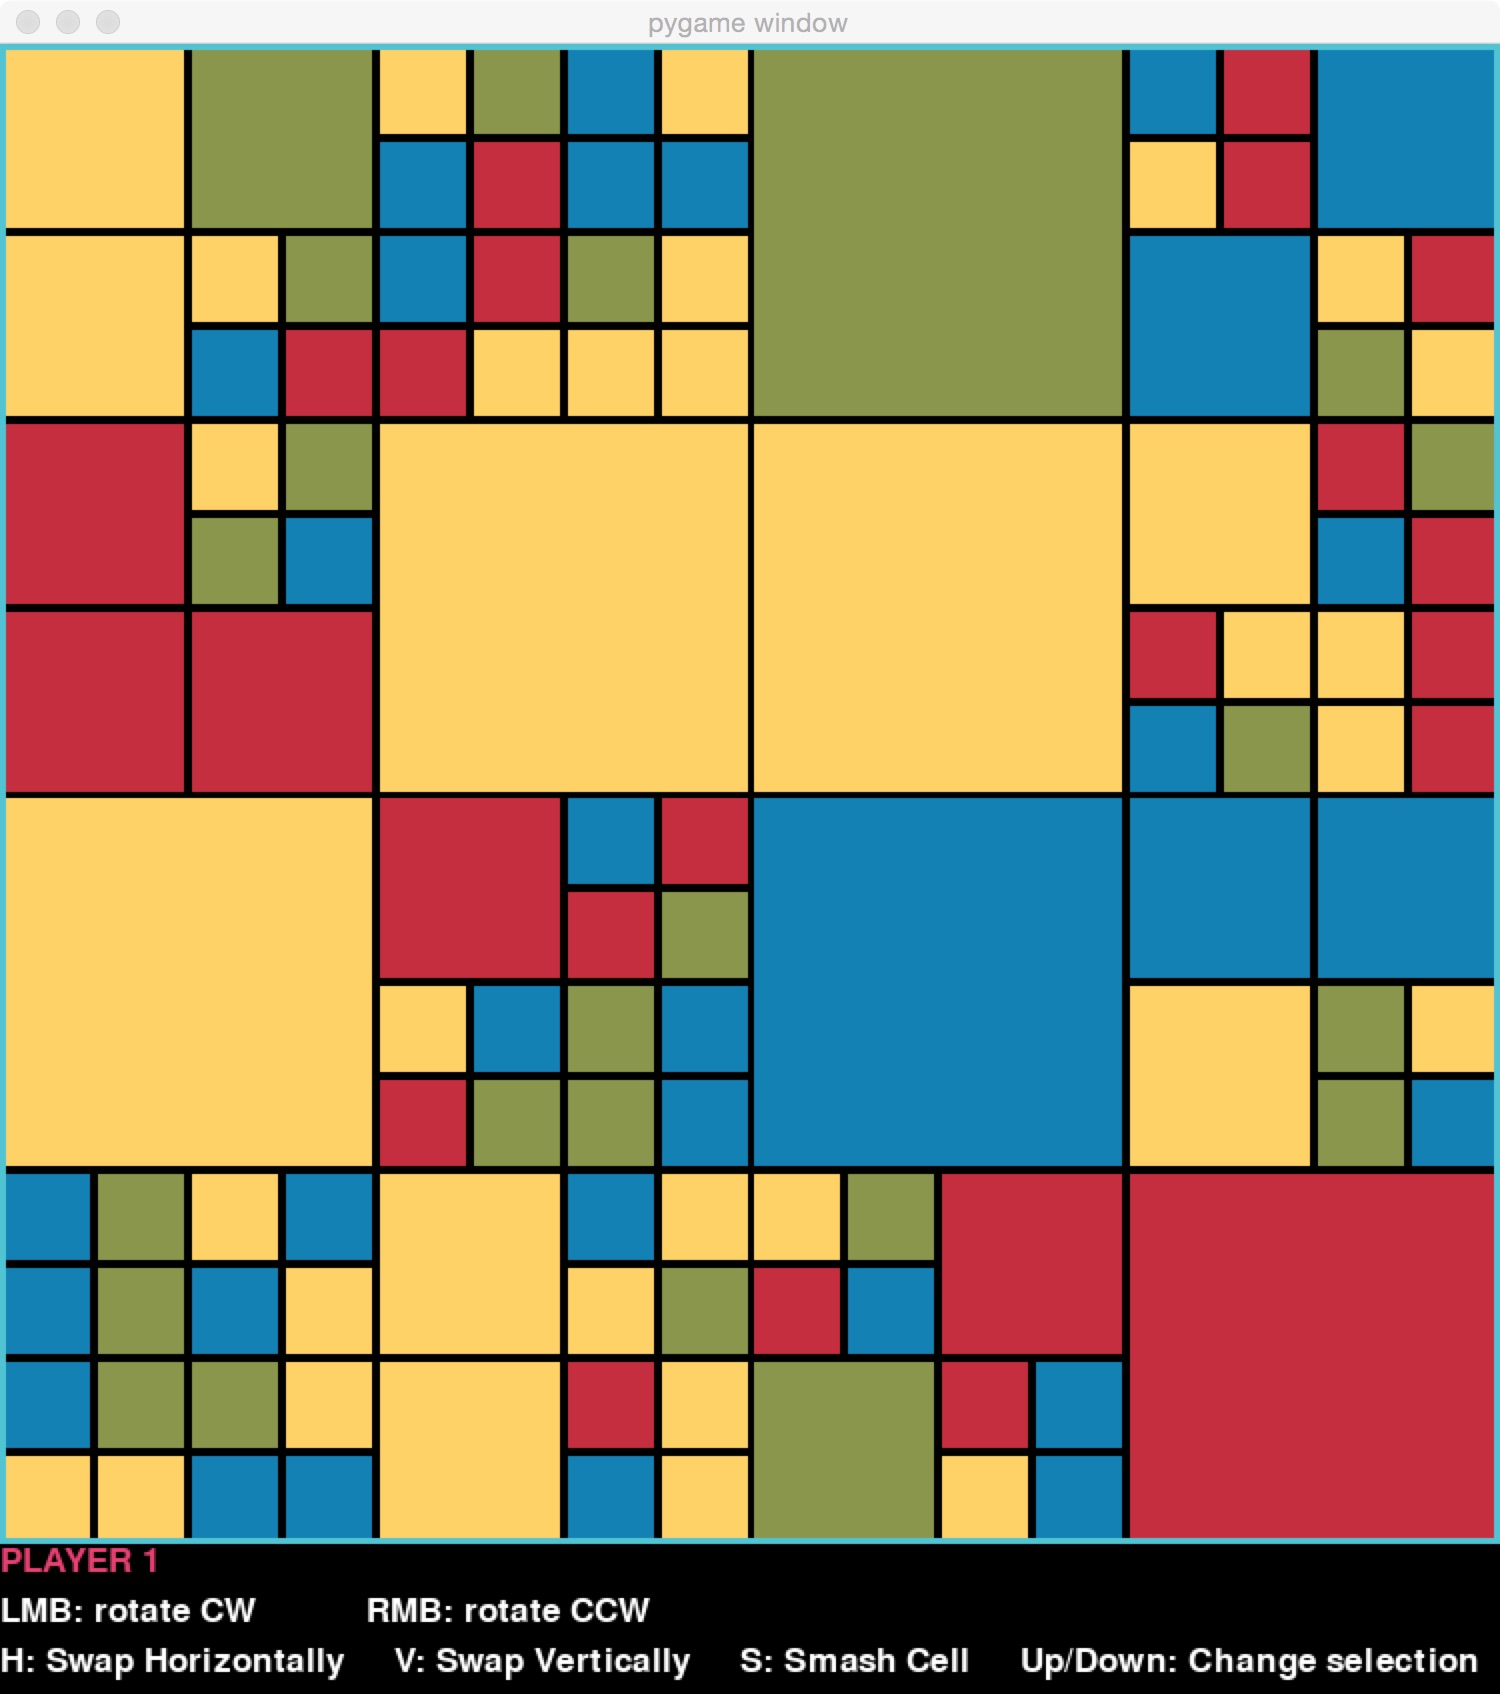
and chooses to rotate it counter-clockwise, the resulting board is this:
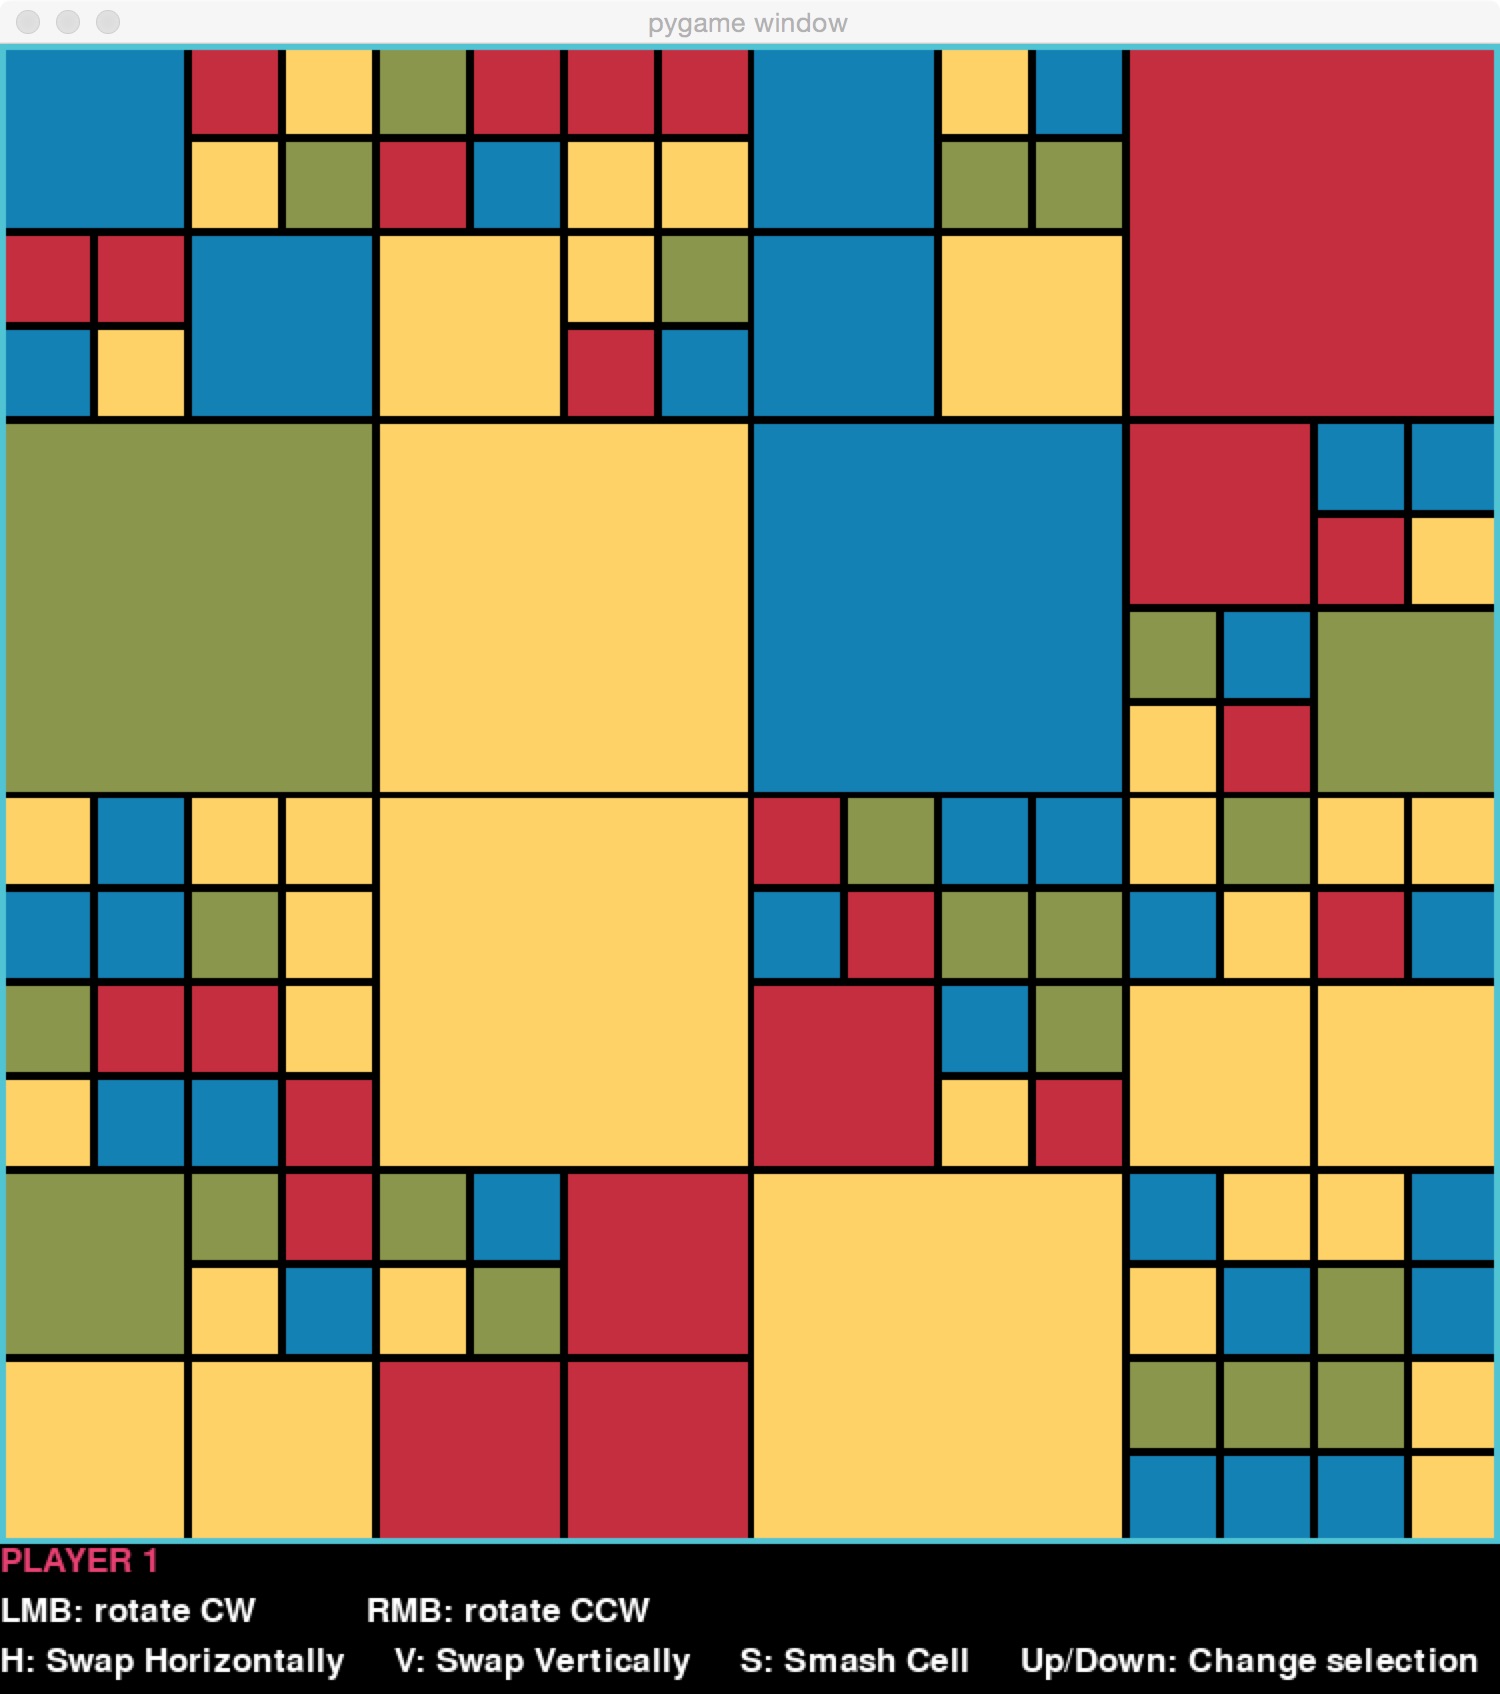
But if instead, on the original board, they rotated the block at level 1 (one level down from the top-level block) in the upper left-hand corner, the resulting board is this:
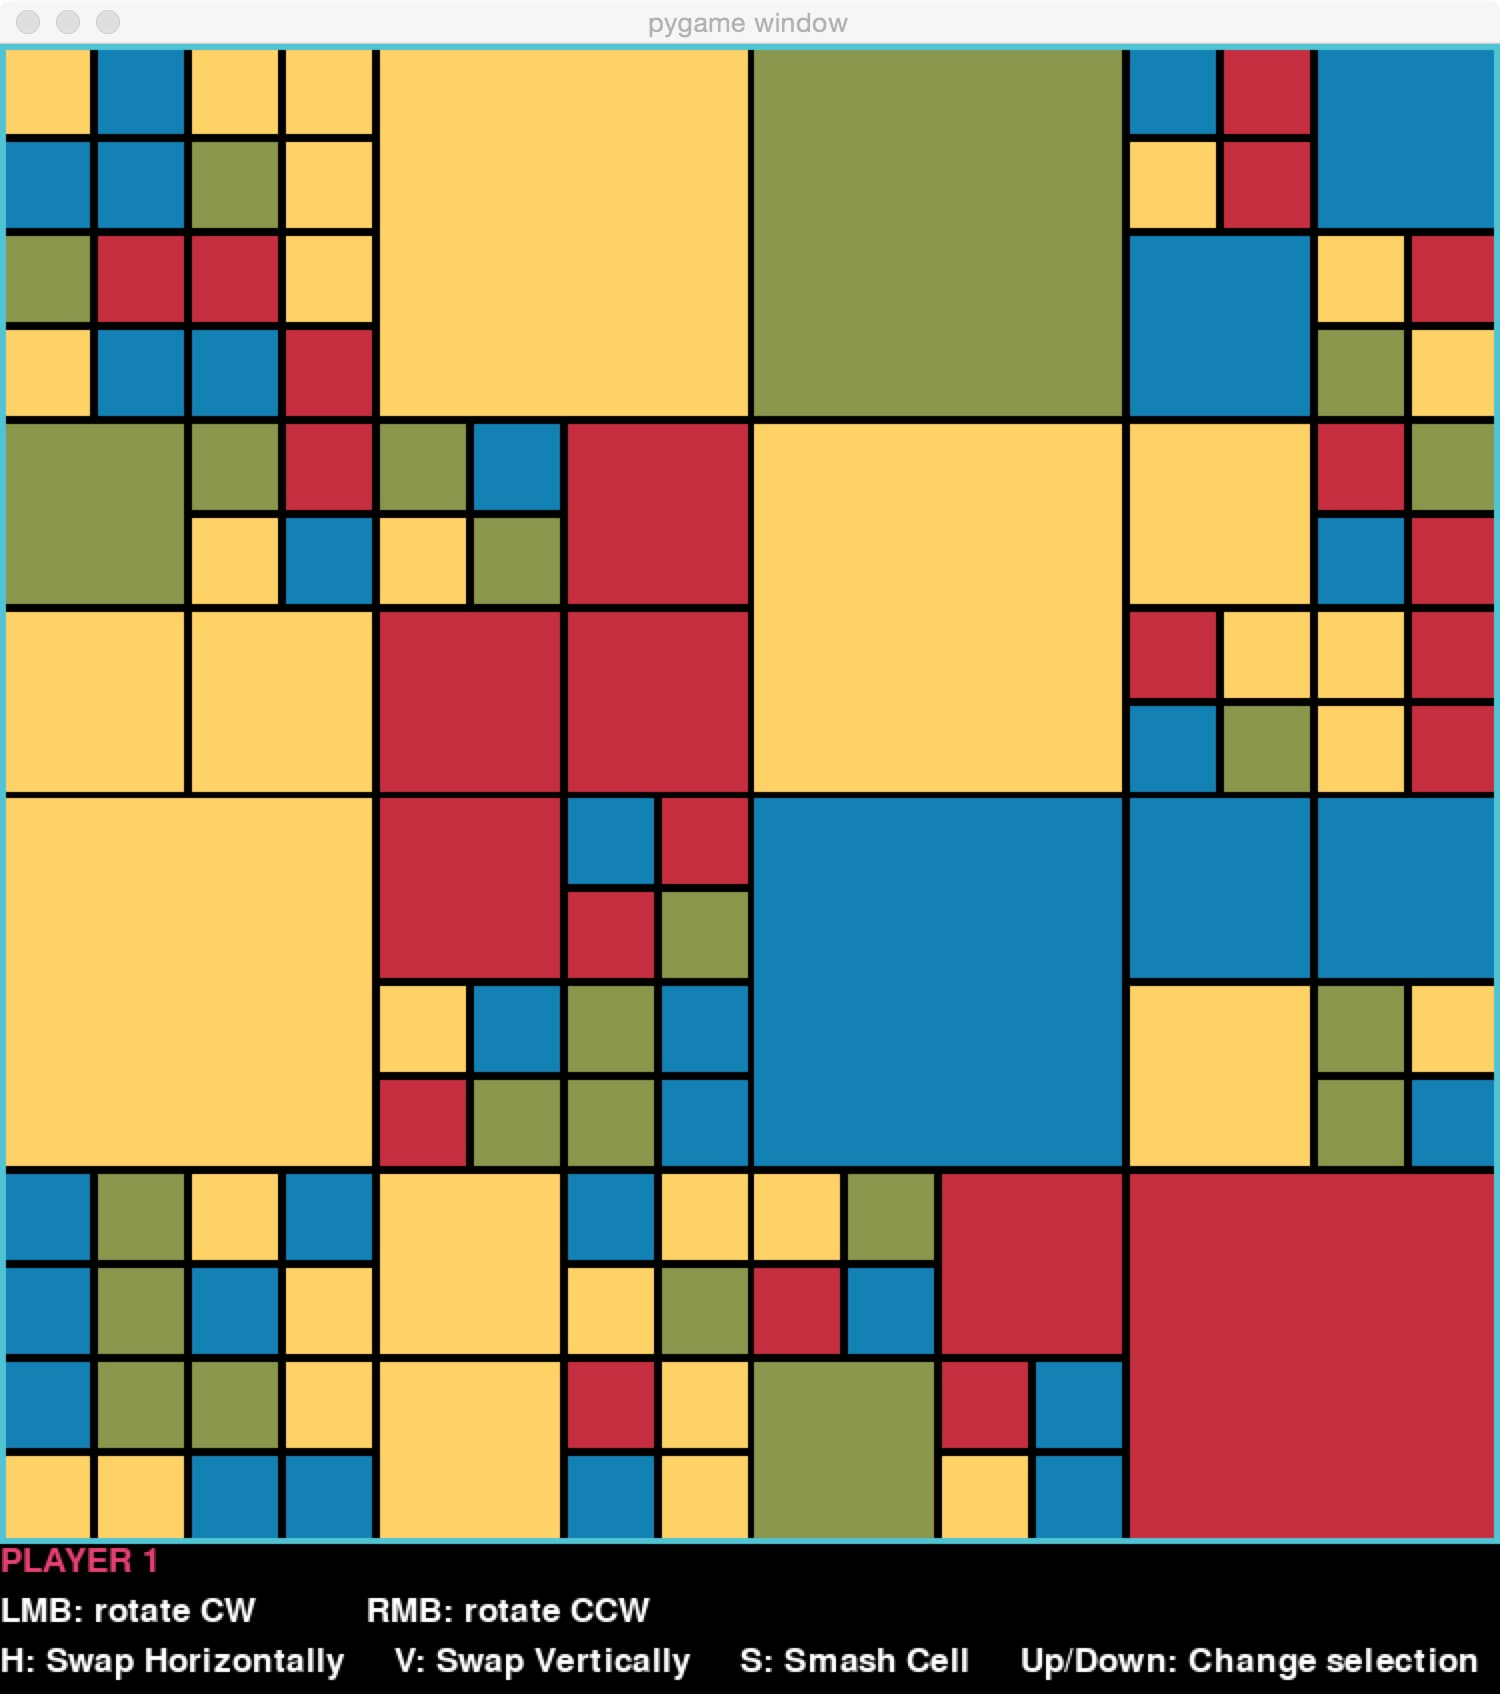
And if instead they were to rotate the block a further level down, still sticking in the upper-left corner, they would get this:
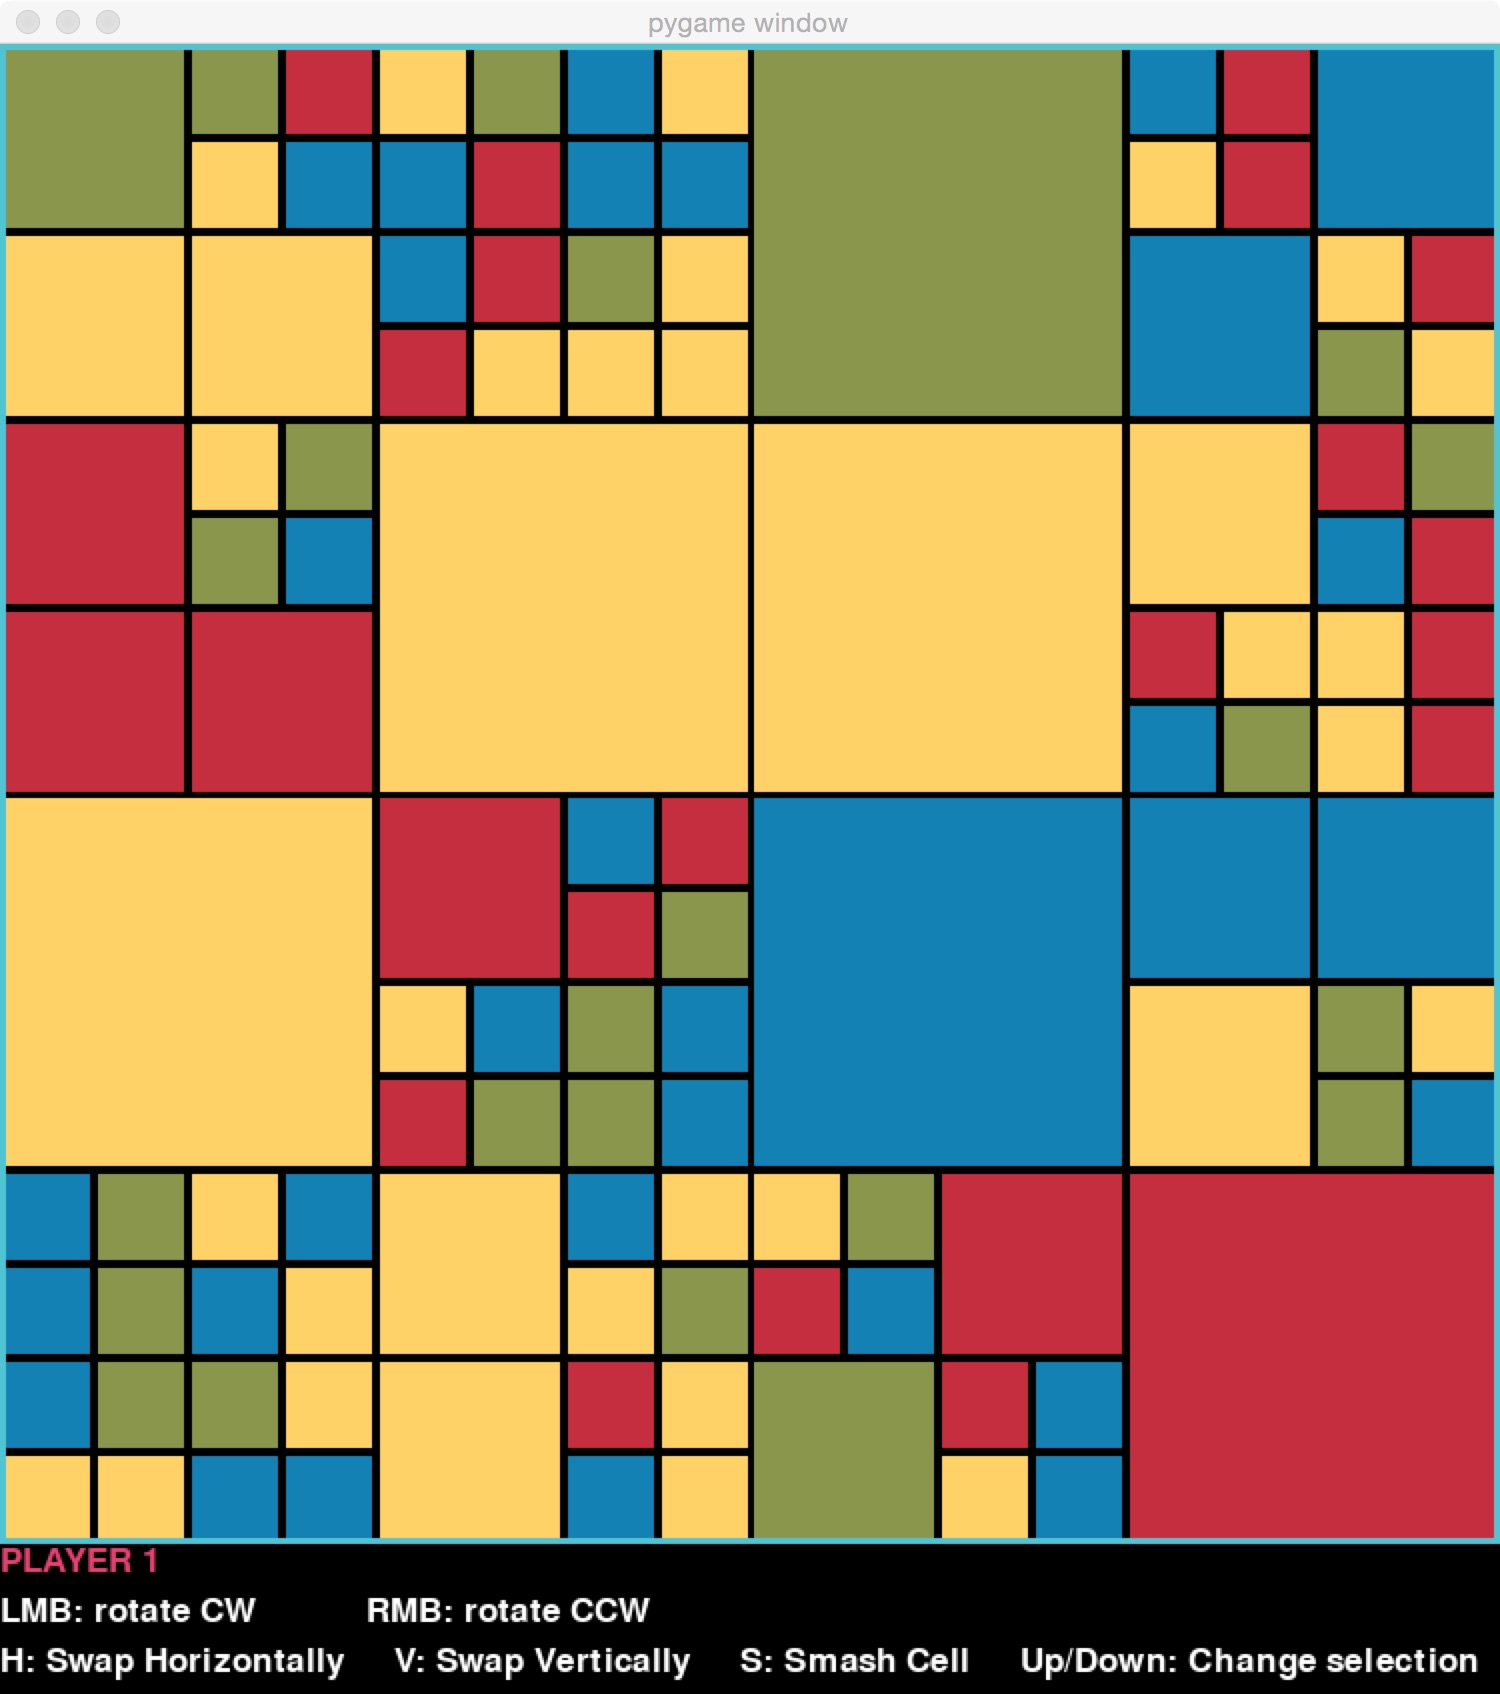
Of course there are many other blocks within the board at various levels that the player could have chosen.
Moves
These are the moves that are allowed on a Blocky board:
- Rotate the selected block either clockwise or counterclockwise
- Swap the 4 sub-blocks within the selected block horizontally or vertically
- “Smash” the selected block: whether it is a solid-coloured block or is already subdivided, give it four new, randomly-generated sub-blocks. Smashing the top-level block is not allowed – that would be creating a whole new game. And smashing a unit cell is also not allowed, since it’s already at the maximum allowed depth.
Goals and scoring
At the beginning of the game, each player is assigned a randomly-generated goal. There are two types of goal:
- Blob goal.
The player must aim for the largest “blob” of a given colour c. A blob is a group of connected blocks with the same colour. Two blocks are connected if their sides touch; touching corners doesn’t count. The player’s score is the number of unit cells in the largest blob of colour c. - Perimeter goal.
The player must aim to put the most possible units of a given colour c on the outer perimeter of the board. The player’s score is the total number of unit cells of colour c that are on the perimeter. There is a premium on corner cells: they count twice towards the score.
Notice that both goals are relative to a particular colour. We will call that the target colour for the goal.
Players
The game can be played solitaire (with a single player) or with two or more players. There is no defined limit on the number of players, although the game would not likely be fun to play with a very large number of players.
There are three kinds of player:
- A human player chooses moves based on user input. Human players are limited to one smash move per game.
- A random player is a computer player that, as the name implies, chooses moves randomly. Random players have no limit on their smashes. But if they randomly choose to smash the top-level block or a unit cell, neither of which is permitted, they forfeit their turn.
- A smart player is a computer player that chooses moves more intelligently: It generates a set of random moves and, for each, checks what its score would be if it were to make that move. Then it picks the one that yields the best score. Smart players cannot smash.
Configurations of the game
A Blocky game can be configured in several ways:
- Maximum allowed depth.
While the specific colour pattern for the board is randomly generated, we control how finely subdivided the squares can be. - Number and type of players.
There can be any number of players of each type. The “difficulty” of a smart player (how hard it is to play against) can also be configured. - Number of moves.
A game can be configured to run for any desired number of moves. (A game will end early if any player closes the game window.)
Setup and starter code
Please download the following starter code files and save these into your assignments/a2 folder.
- block.py
- game.py
- goal.py
- player.py
- renderer.py. Don’t change this file. All your work will be in the other files.
- rectangle_test.py. This will help you test
get_draw_rectangles. - simple_test.py. A simple test for each of methods we can autotest.
Task 1: Understand the Block data structure
Surprise, surprise: we will use a tree to represent the nested structure of a block. Our trees will have some very strong restrictions on their structure and contents, however. For example, a node cannot have 3 children. This is because a block is either solid-coloured or subdivided; if it is solid-coloured, it is represented by a node with no children, and if it is subdivided, it is subdivided into exactly four sublocks. Representation invariants document this rule and several other critically important facts.
- Open
block.py, and read through the class docstring carefully. ABlockhas quite a few attributes to understand, and the Representation Invariants are critical. - Draw the
Blockdata structure corresponding to the game board below, assuming the maximum depth was 2 (and notice that it was indeed reached). You can just write a letter for each colour value. Assume that the size of the top-level block is 750.
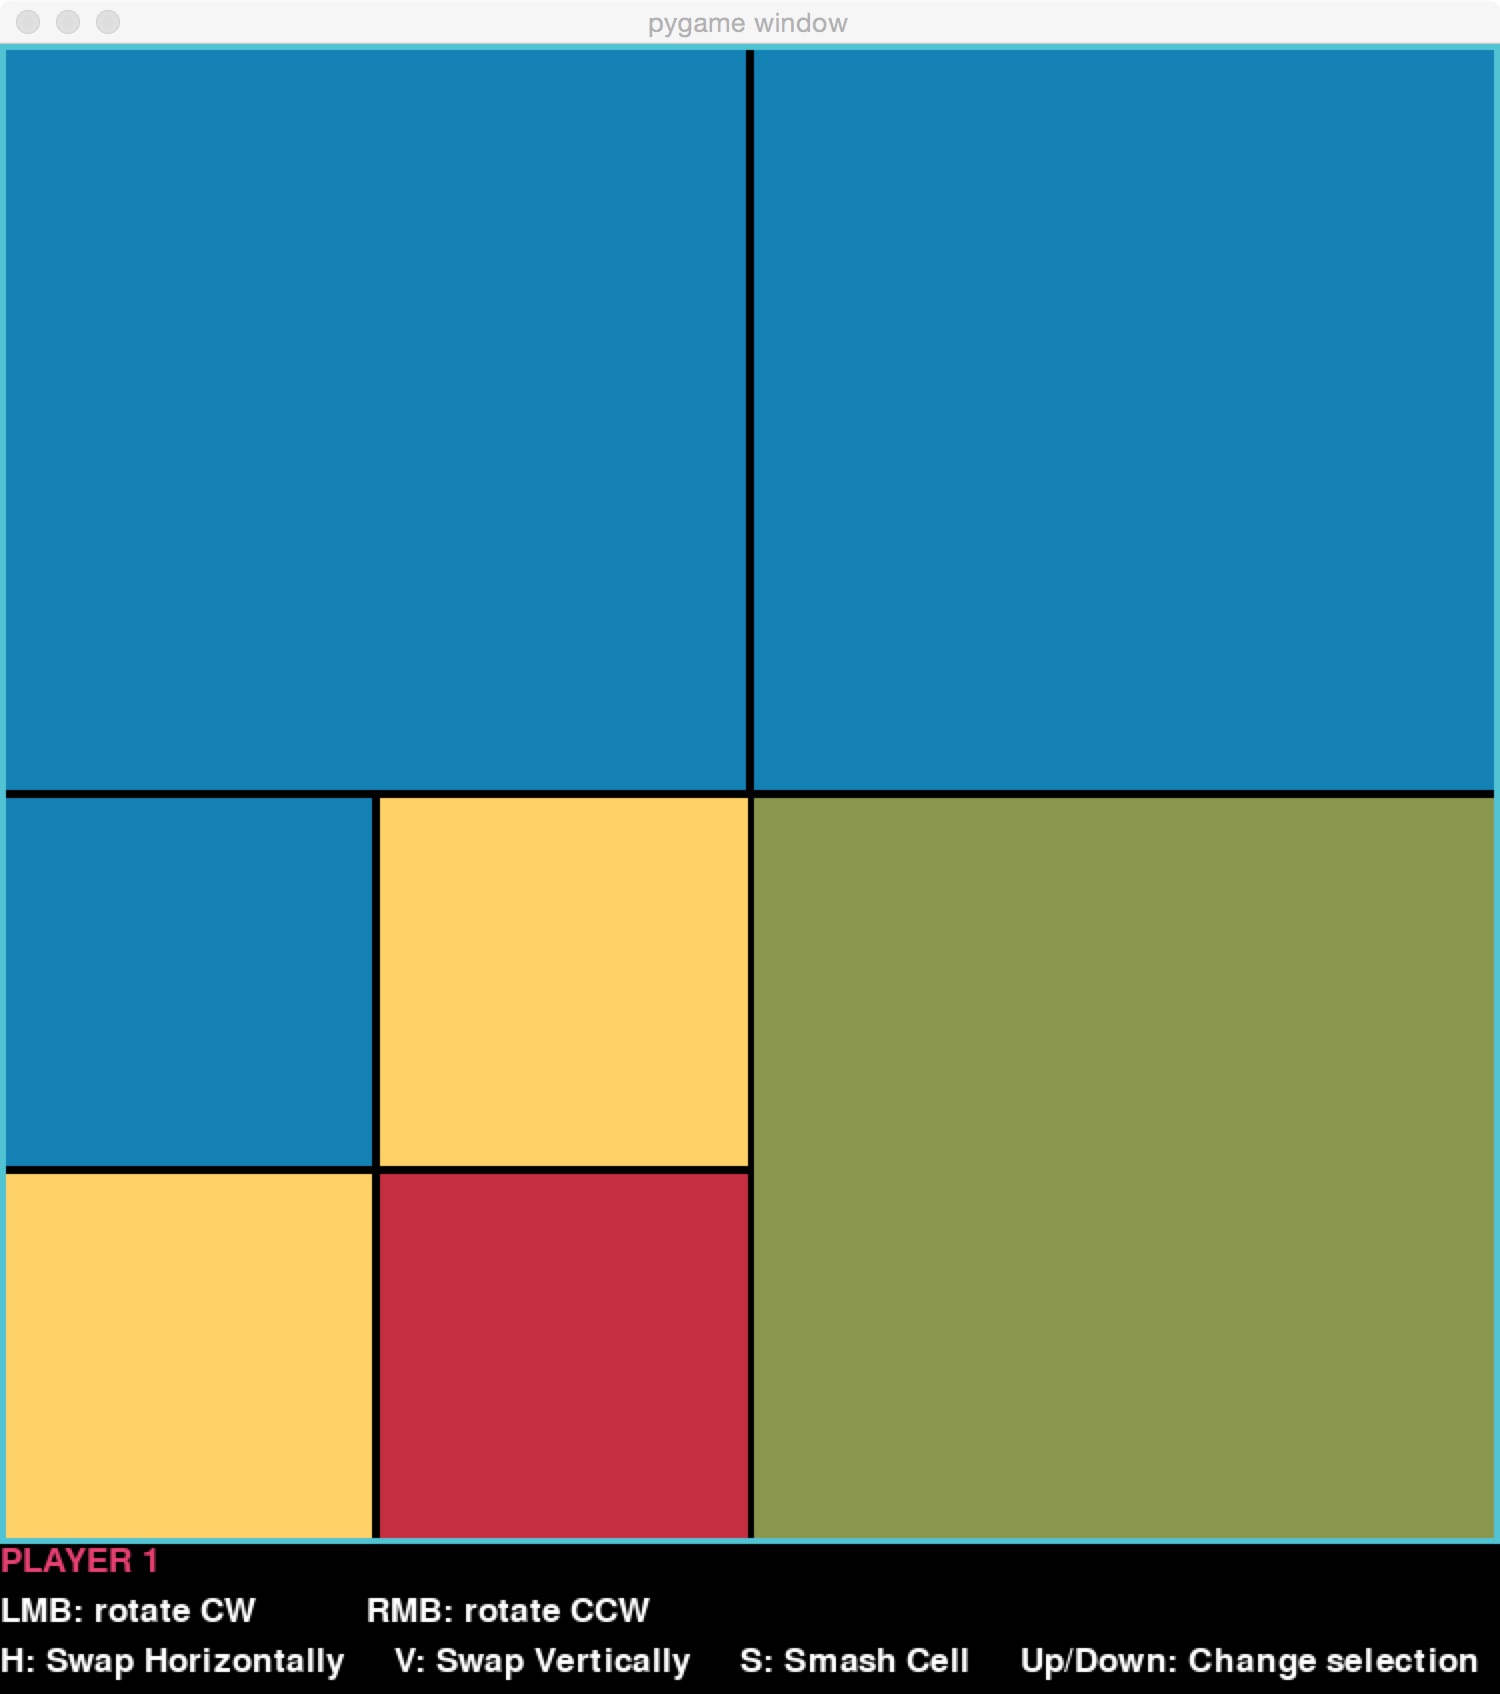
Did you draw 9 nodes? Do the attribute values of each node satisfy the representation invariants? NB: If you come to office hours, we will ask to see your drawing before answering questions!
Task 2: Initialize Blocks and draw them
With a good understanding of the data structure, you are ready to start implementing class Block.
- Write method
__init__. To make any interesting
Blocks using this rudimentary initializer would be incredibly tedious. And for the game, we want to be able to generate random boards. This is what functionrandom_initis for. Implement this function, which you will find at the top level of the module, outside any class. It is outside theBlockclass because it doesn’t need to refer toself.Here is the strategy to use in
random_init: If aBlockis not yet at its maximum depth, it can be subdivided; this function must decide whether or not to actually do so. To decide:- Use function
random.randomto generate a random number in the interval [0, 1). - Subdivide if the random number is less than
math.exp(-0.25 * level), wherelevelis the level of theBlockwithin the tree. - If a
Blockis not going to be subdivided, use a random integer to pick a colour for it from the list of colours inrenderer.COLOUR_LIST.
Notice that the randomly-generated
Blockmay not reach its maximum allowed depth. It all depends on what random numbers are generated.Function
Implementation note: functionrandom_initis responsible for giving appropriate values to the attributes of allBlocks within theBlockit generates except attributespositionandsize. In the next step, you will write a method that a client can use to set these attributes.random_initcan do its work almost entirely through calls to the initializer forBlock.- Use function
- Define method
update_block_locations, which updates the values for attributespositionandsizethroughout aBlock, ensuring that they are consistent with the representation invariants for the class. Notice that thepositionandsizeof aBlockare determined by thepositionandsizeof its parentBlock. To make a
Blockdrawable, we must be able to provide a list of rectangles to the renderer. Write methodrectangles_to_draw. (This may remind you of the tiling task in a recent lab.)
We can’t mutate a Block yet, but we will have enough to go through the steps of a game once we define at least one kind of Player and Goal, and get the Game class ready.
Check your work: We will provide a function called print_block the will print the contents of a Block in text form. Use this to confirm that your __init__ and random_init work correctly. We will provide some pytest code for testing your method get_draw_rectangles You will be able to test get_selected_block once the game is running.
Task 3: Complete basic goal classes
We need to have some basic ability to set goals and compute a player’s score with respect to their goal.
- Open
goal.pyand get familiar with the interface for the abstract classGoal. It has some basic infrastructure for storing information that any goal must have. It also defines an abstract methodsscoreanddescriptionthat any child class must implement. - Define both of the specific goal classes:
BlobGoalandPerimeterGoal. (We have startedBlobGoalfor you.) For now, have all goals report the same value for score no matter what the state of the board is. How about 148?:-)Ignore the method_undiscovered_blob_size; you will implement and use it when you implement scoring for real.
Check your work: With the game running after Task 4, you will be able to see that the pieces of code connect together.
Task 4: Complete class Game
Now we have enough pieces to assemble a rudimentary game!
- Open
game.pyand review the docstring for classGame. Make sure that you understand all its attributes. This class has only two methods, and we’ve implemented method
run_gamefor you. Implement the initializer. It must do the following:- Create a Renderer for this game.
- Generate a random goal type, for all players to share.
- Generate a random board with the given maximum depth.
- Generate the right number of human players, random players, and smart players (with the given difficulty levels), in that order. Give the players consecutive player numbers, starting at 0. Assign each of them a random target colour and display their goal to them.
- Before returning, draw the board.
We have written an abstract
Playerclass and aHumanPlayersubclass for you. In order for the user to play the game, they must be able to select a block for action (such as for rotating) by hovering over the board to a desired location, and using the up and down arrows to choose a level. Inblock.py, methodget_selected_blocktakes those user inputs and finds the correspondingBlockwithin the tree. Implement that method.
Check your work: You should be able to run a game with only human players. Try running method two_player_game – you can uncomment out the call to it in the main block of module game. To select a block for action, put the cursor anywhere inside it and use the up and down arrow keys to select the desired level. The area at the bottom of the game board tells you how to select an action.
So far, no real moves are happening and the score never changes, but you should see the board, see play pass back and forth between players (as indicated by the red “PLAYER n” label just below the board), and the game should end when the desired number of moves has been reached.
Task 5: Make Blocks mutable
Let’s make the game real by allowing players to make moves on the board.
- Review the representation invariants for class
Block. They are critical to the correct functioning of the program, and it is the responsibility of all methods in the class to maintain their truth. - Define methods
swap,rotateandsmash. Ensure that each of them callsupdate_block_locationsbefore returning. - Double check that each of your mutating methods maintains the representation invariants of class
Block.
Check your work: Now when you play the game, you should see the board changing. You may find it easiest to use function solitaire_game to try out the various moves.
Task 6: Implement scoring for perimeter goals
Now let’s get scoring working.
The unit we use when scoring against a goal is a unit cell. The size of a unit cell depends on the maximum depth in the Block. For example, with maximum depth of 4, we might get this board:
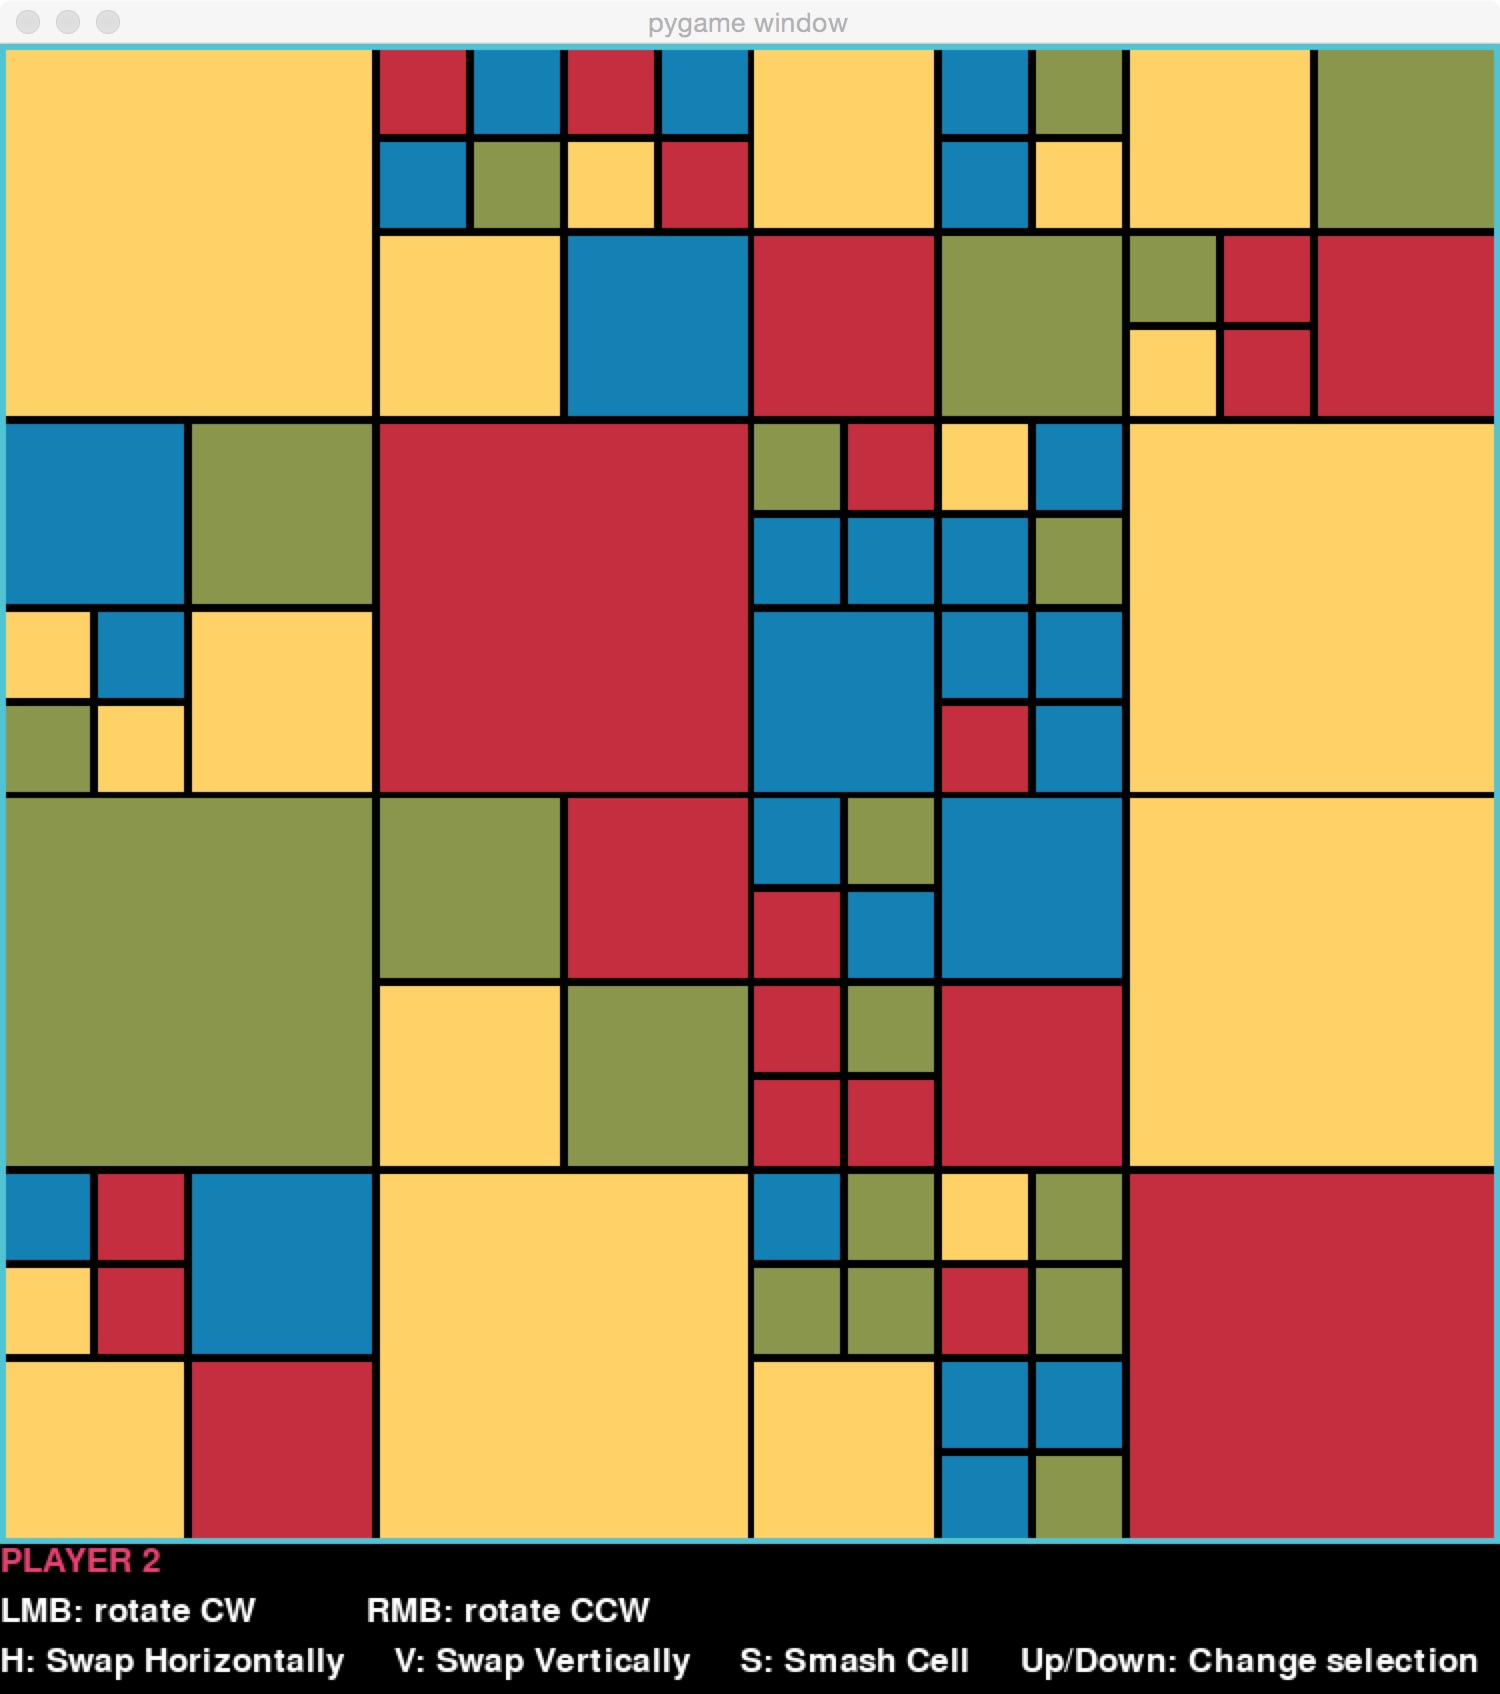
If you count down through the levels, you’ll see that the smallest blocks are at level 4. Those blocks are unit cells. It would be possible to generate that same board even if maximum depth were 5. In that case, the unit cells would be one size smaller, even though no Block has been divided to that level.
Notice that the perimeter may include unit cells of the target colour as well as larger blocks of that colour. For a larger block, only the unit-cell-sized portions on the perimeter count. For example, suppose maximum depth were 3, the target colour were red, and the board were in this state:
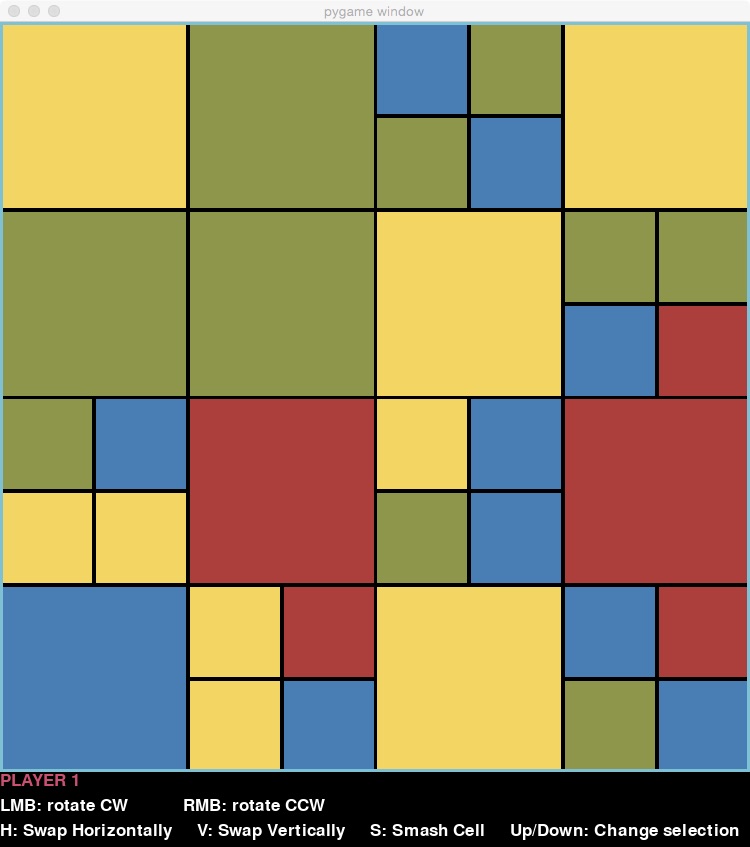
Only the red blocks on the edge would contribute, and the score would be 4: one for each of the two unit cells on the right edge, and two for the unit cells inside the larger red block that are actually on the edge. (Notice that the larger red block isn’t divided into four unit cells, but we still score as if it were.)
Remember that corner cells count twice towards the score. So if the player rotated the lower right block to put the big red block on the corner:
the score would rise to 6.
Now that we understand these details of scoring for a perimeter goal, we can implement it.
- It is very difficult to compute a score for a perimeter goal or a blob goal by walking through the tree structure. (Think about that!) The goals are much more easily assessed by walking through a two-dimensional representation of the game board. Your next task is to provide that possibility: In module
block, define methodflatten. - Now re-implement the
scoremethod in classPerimeterGoalto truly calculate the score. Begin by flattening the board to make your job easier!
Check your work: Now when you play the game, if a player has a perimeter goal, you should see the score changing. Check to confirm that it is changing correctly.
Task 7: Implement scoring for blob goals
Scoring with a blob goal involves flattening the tree, iterating through the cells in the flattened tree, and finding out, for each cell, what size of blob it is part of (if it is part of a blob of the target colour). The score is the biggest of these.
But how do we find out the size of the blob that a cell is part of? (Sounds like a helper method, eh?) We’ll start from the given cell and
- if it’s not the target colour, then it is not in a blob of the target colour, so this cell should report 0.
- if it is of the target colour, then it is in a blob of the target colour. It might be a very small blob consisting of itself only, or a bigger one. It must ask its neighbours the size of blob that they are in, and then use that to report its own blob size. (Sounds, recursive, eh?)
A potential problem with this is that when we ask a neighbour for their blob size, they will count us in that blob size, and this cell will end up being double counted (or worse). To avoid such issues, we will keep track of which cells have already been “visited” by the algorithm. To do this, make another nested list structure that is exactly parallel to the flattened tree. In each cell, store:
- -1 if the cell has not been visited yet
- 0 if it has been visited, and it is not of the target colour
- 1 if it has been visited and is of the target colour
Your task is to implement this algorithm.
- Open
goal.pyand read the docstring for helper method_undiscovered_blob_size. - Draw a 4-by-4 grid with a small blob on it, and a parallel 4-by-4 grid full of -1 values. Pick a cell that is in your blob, and suppose we call
_undiscovered_blob_size. Trace what the method should do. Remember not to unwind the recursion! Just assume that when you ask a neighbour to report its answer, it will do it correctly (and will update thevisitedstructure correctly). - Implement
_undiscovered_blob_size. - Now replace your placeholder implementation of
BlobGoal.scorewith a real one. Use_undiscovered_blob_sizeas a helper method.
Although we only have two types of goal, you can see that to add a whole new kind of goal, such as stringing a colour along a diagonal, one would only have to define a new child class of Goal, implement the score method for that goal, and then update the code that configures the game to include the new goal as a possibility.
Check your work: Now when you play the game, a player’s score should update after each move, regardless of what type of goal the player has.
Task 8: Add random and smart players
Inside
player.py, Implement classRandomPlayer. Methodmake_moveshould do the following:- Randomly choose a block.
- Highlight the chosen block and draw the board.
- Call
pygame.time.wait(TIME_DELAY)to introduce a delay so that the user can see what is happening. - Randomly choose one of the 5 possible types of action and do it on the chosen block.
- Un-highlight the chosen block and draw the board again.
Implement class
SmartPlayer. ASmartPlayerhas a “difficulty” level, which indicates how difficult it is to play against it. The difficulty level is an integer >= 0, and dictates how many possible moves it compares when choosing a move to make. For example, if difficulty is 0, it compares 5 possible moves. See the table below for the meaning of the other difficulty levels.Difficulty Moves to compare 0 5 1 10 2 25 3 50 4 100 5 150 >5 150 When generating these random moves to compare, don’t forget that a
SmartPlayerisn’t allowed to do smashes.In order to assess each of the possible moves and pick the best one, the
SmartPlayermust actually apply the move, score it, and then undo the move. None of this moving and undoing shows on the screen because we won’t ask the renderer to draw the board while this is happening.Method
make_moveshould do the following:- Assess the right number of possible moves and pick the best one among them.
- Highlight the block involved in the chosen move, and draw the board.
- Call
pygame.time.wait(TIME_DELAY)to introduce a delay so that the user can see what is happening. - Do the chosen move.
- Un-highlight the block involved in the chosen move, and draw the board again.
Check your work: Now you can run games with all types of players.
Polish!
Take some time to polish up. This step will improve your mark, but it also feels so good. Here are some things you can do:
- Pay attention to any violations of the “PEP8” Python style guidelines that PyCharm points out. Fix them!
- Read through and polish your internal comments.
- Remove any code you added just for debugging, such as print statements.
- Remove any
passstatement where you have added the necessary code. - Remove the word “TODO” wherever you have completed the task.
- Take pride in your gorgeous code!